Connect your workspace and local folder. Give your agent approved access, install the Runtime Plugin and required Skills, then run your first verified task.
Watch the 17-minute walkthrough with Adam, then follow the steps at your own pace. Leave time for provider setup and a genuine scheduled test.
New to Outloop? See a first workspace in 36 seconds
One client in its own workspace, its Context added, its tools connected with clear access boundaries, then the first task. The full walkthrough below covers every step.
36-second setup preview · English captions
Read the video transcript
Give your AI worker a workspace built around your client. Start with one client, in their own workspace. Add the Context that makes the work specific to them. Connect the tools it needs, with clear access boundaries. Then give Ollie its first task. Create your trial. Download for Mac. Put your first AI worker to work.
Two narration lines are silent in the Custom API test sequence. The screen recording and on-screen captions continue through both gaps.
Introduction0:00 / 17:16
Read the transcript
Hi, I'm Adam. In the next few minutes we're going to set up a workspace that Claude can actually use. That means the right local folder, approved access to the APIs you need, and results we can check. Most of the technical work the agent will do for us.
The one thing it never touches is the credential. That stays in Outloop, and I'll show you exactly where. I’ll start by creating a workspace for this demo. This gives the work a clear home: a specific local folder, with its own approved access.
I choose Claude and Cowork, check the name and location, and let Outloop create the folder. Next, I’ll connect that exact folder in Claude. The folder location is what connects these two apps. I copy it from Outloop and reveal it in Finder.
The connection instructions are already inside. Keep this folder: creating another one with the same name would not give Claude the same context. In Claude, I create a project using the folder Outloop just made. I review the permission for that folder and create the project.
Then I check that Claude shows the local folder on this computer. That is the connection we need; a matching project name by itself is not enough. Before changing access, I check the workspace again. This demo uses workspace 025.
Claude’s connected folder and Outloop’s selected workspace need to refer to the same place, so I know exactly where the next action will run. A shared credential can be reused without showing its value. I assign OpenAI to this demo workspace and keep the test to a read-only model-list request. The audit shows that the real request succeeded through Outloop.
This was temporary demo access; I removed the assignment after filming. For a dedicated credential, I confirm the provider and choose only this workspace. I enter the credential privately in Outloop, off-camera. The agent needs the assigned access, not the key.
Saving it is one step; we still verify the integration separately. I install the complete Skill package through Claude’s Skills screen, then check that it is enabled. The Skill gives the agent instructions for this workflow. Seeing it installed is the first check; we’ll also test whether the agent actually uses it in a fresh task.
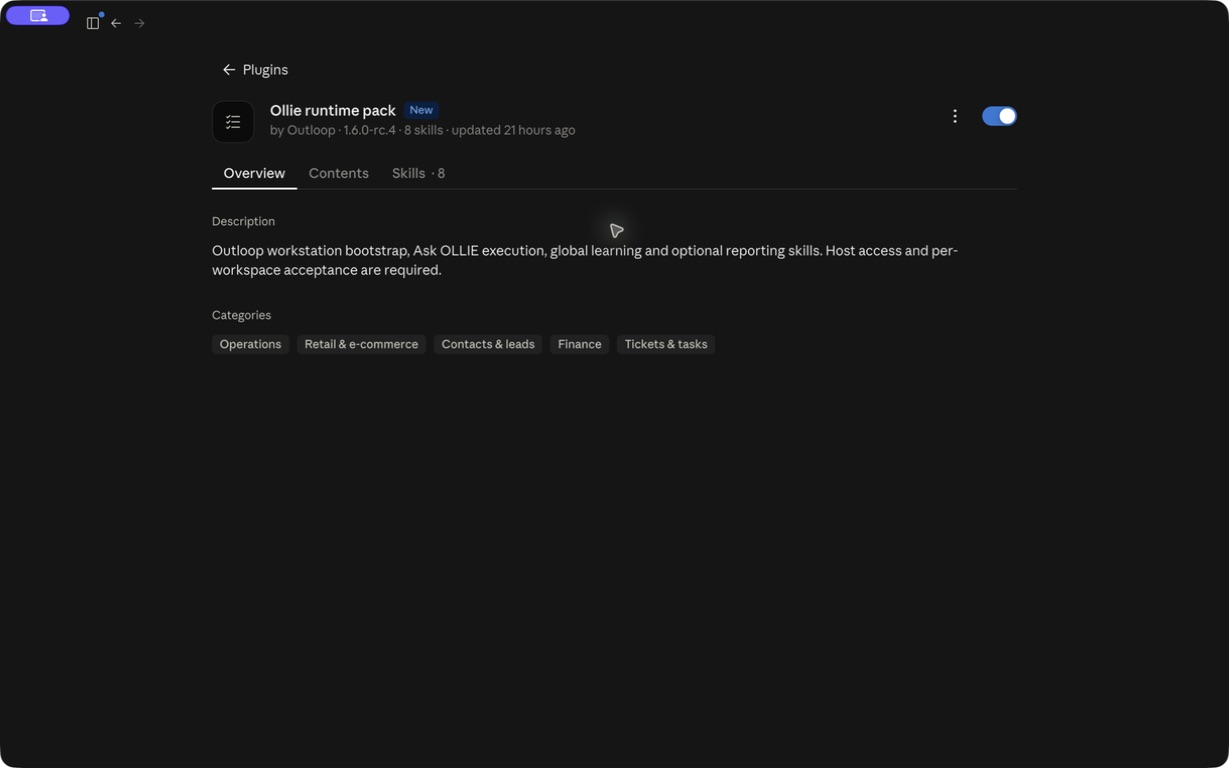
The Plugin uses Claude’s Plugin upload route. This package is already present, so I review the replacement before confirming it. Then I check the enabled package and its eight Skills. Installation alone does not prove it works.
The fresh-task footage shows the runtime Skill loading, and the provider receipt shows it was usable. We’ll return to that same read after the API setup chapter. You do not have to understand every API field yourself. I download three Skills from the guide.
Outloop Custom API Setup helps the agent prepare the integration. API Integration Development supports the technical research. Custom API Operations guides approved work after setup. Keep the complete ZIP packages for installation.
These are the catalog versions tested in this recording; their candidate status still matters. I use Claude’s Skills upload route and select the complete ZIP. Keep the package zipped. I review Outloop Custom API Setup and save it.
Claude checks the package before installation. This recording replaces an existing copy. I check the intended package, confirm replacement and verify it is enabled. I repeat the upload for API Integration Development and check its enabled state.
The catalog package version is different from Claude’s revision number. Finally, I install Custom API Operations. With all three enabled, I start a fresh task in the connected folder to test actual activation and use. Now I tell the agent the outcome I want: set up PandaDoc Sandbox for this Outloop workspace, research the official documentation, and verify a small, approved operation.
I ask it to use the installed Skills. If it needs a credential, it must ask me to enter it directly in Outloop. The prompt contains no key. The agent checks PandaDoc’s official documentation before configuring anything.
Here it confirms the Sandbox restrictions and that creating a draft is separate from sending it. That distinction keeps this demo’s approval narrow. The agent prepares the integration through Outloop. Here we review the definition it produced: the official destination, authentication template, and limited operations.
Outloop holds the credential; the agent works with its assigned reference. This is an edited review of the completed configuration. The secure handoff comes next as an explanation of the human-only step, not a second credential entry. I confirm the provider and workspace.
The credential is entered only in Outloop, with recording stopped. After it is saved and assigned, the agent continues without seeing it. Never paste the key into Claude. Validation checks the corrected definition without calling the provider.
The agent saves the configuration and preflights the workspace’s allowed operation. Then a real provider request checks whether the integration actually works. Outloop shows the saved configuration, assigned credential and fresh provider verification. Match that evidence to the intended operation and workspace.
Now I ask for a small, approved PandaDoc read in the connected folder. Claude checks the workspace and its access before making the request. I match the result to the request and workspace. HTTP 200 confirms the read succeeded; an empty list is a valid result.
Outloop’s receipt reports no secret exposure. Here is the same first-task receipt again: workspace 025, the matching request, HTTP 200, and no secret exposure reported. I hold it here so we can inspect the result. Let’s look at what the agent prepared.
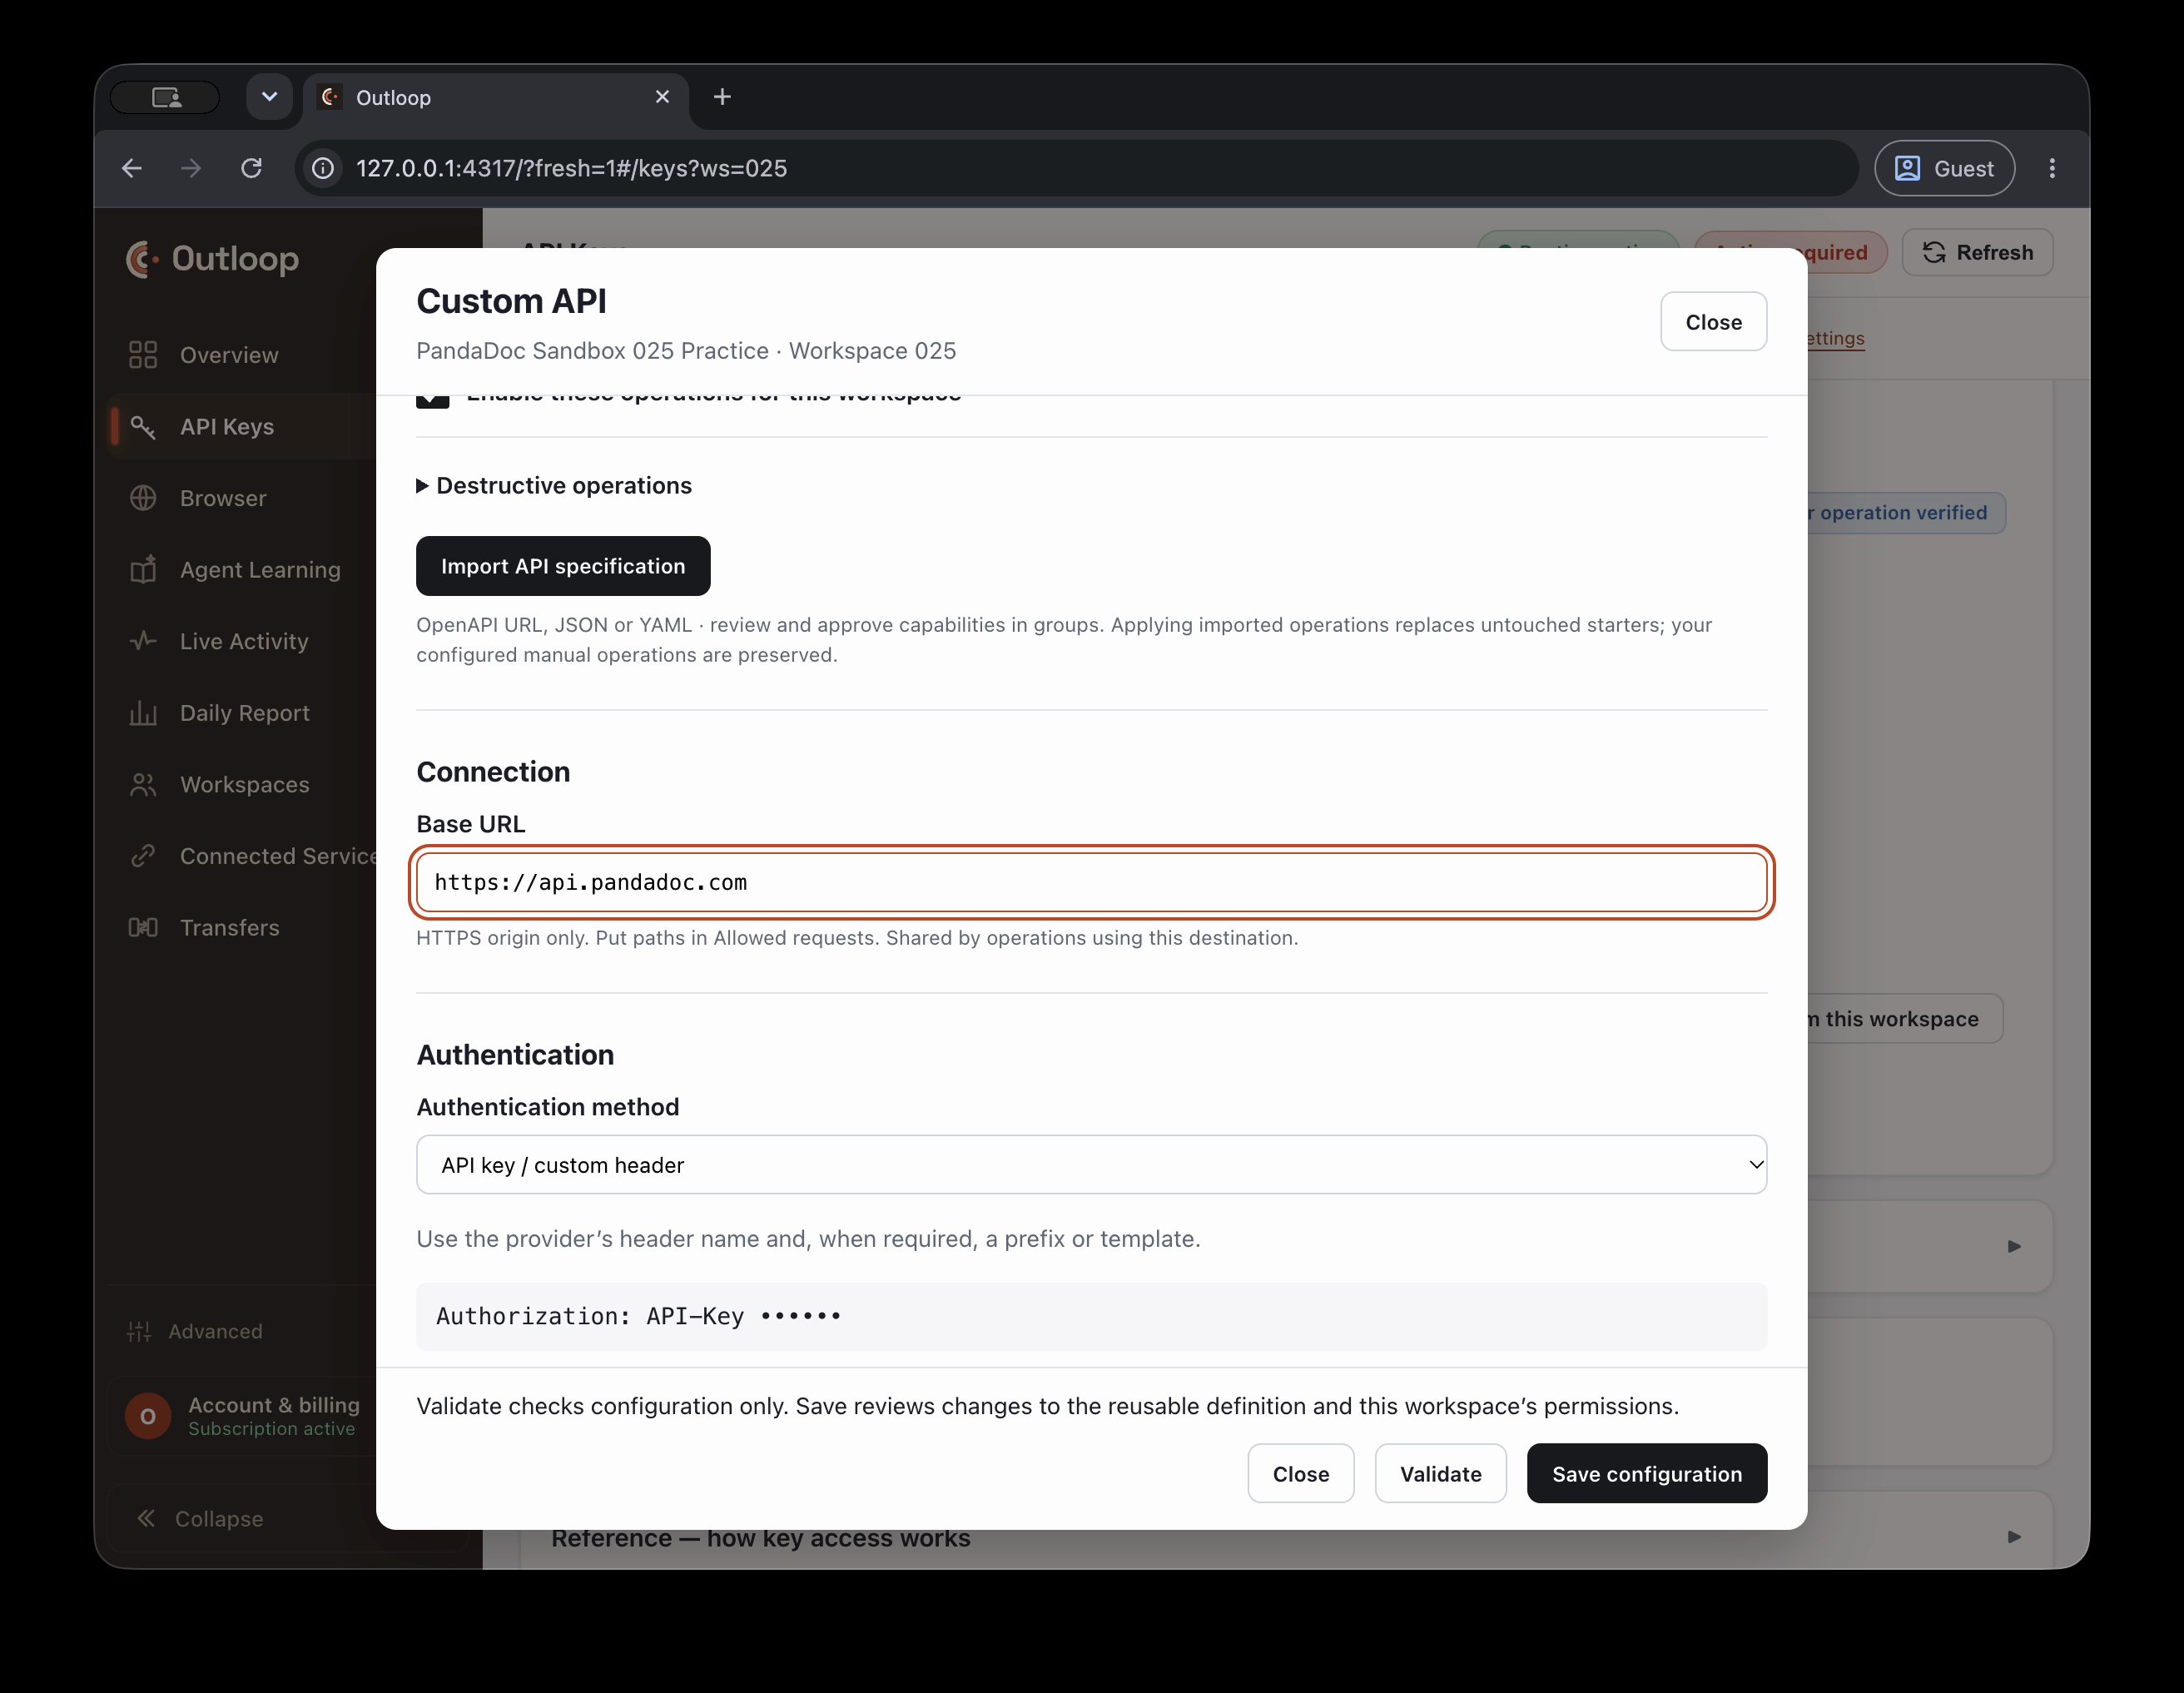
The connection uses PandaDoc’s HTTPS API origin, and the authentication template refers to a credential kept in Outloop. The read operation defines its path, inputs and response type. Here the query is constrained to our synthetic demo. Validate checks the definition, without calling PandaDoc.
I’m reviewing the existing integration, so I close this inspection without saving unnecessary changes. The test panel prepares a request for one declared operation. Here I choose the bounded demo inputs and copy the generated prompt. Copying it does not call PandaDoc.
The connected Cowork task provides the real read receipt. I check the workspace, request and HTTP 200 result. This receipt is reused from the first-task demonstration. The agent checks that exact document’s state.
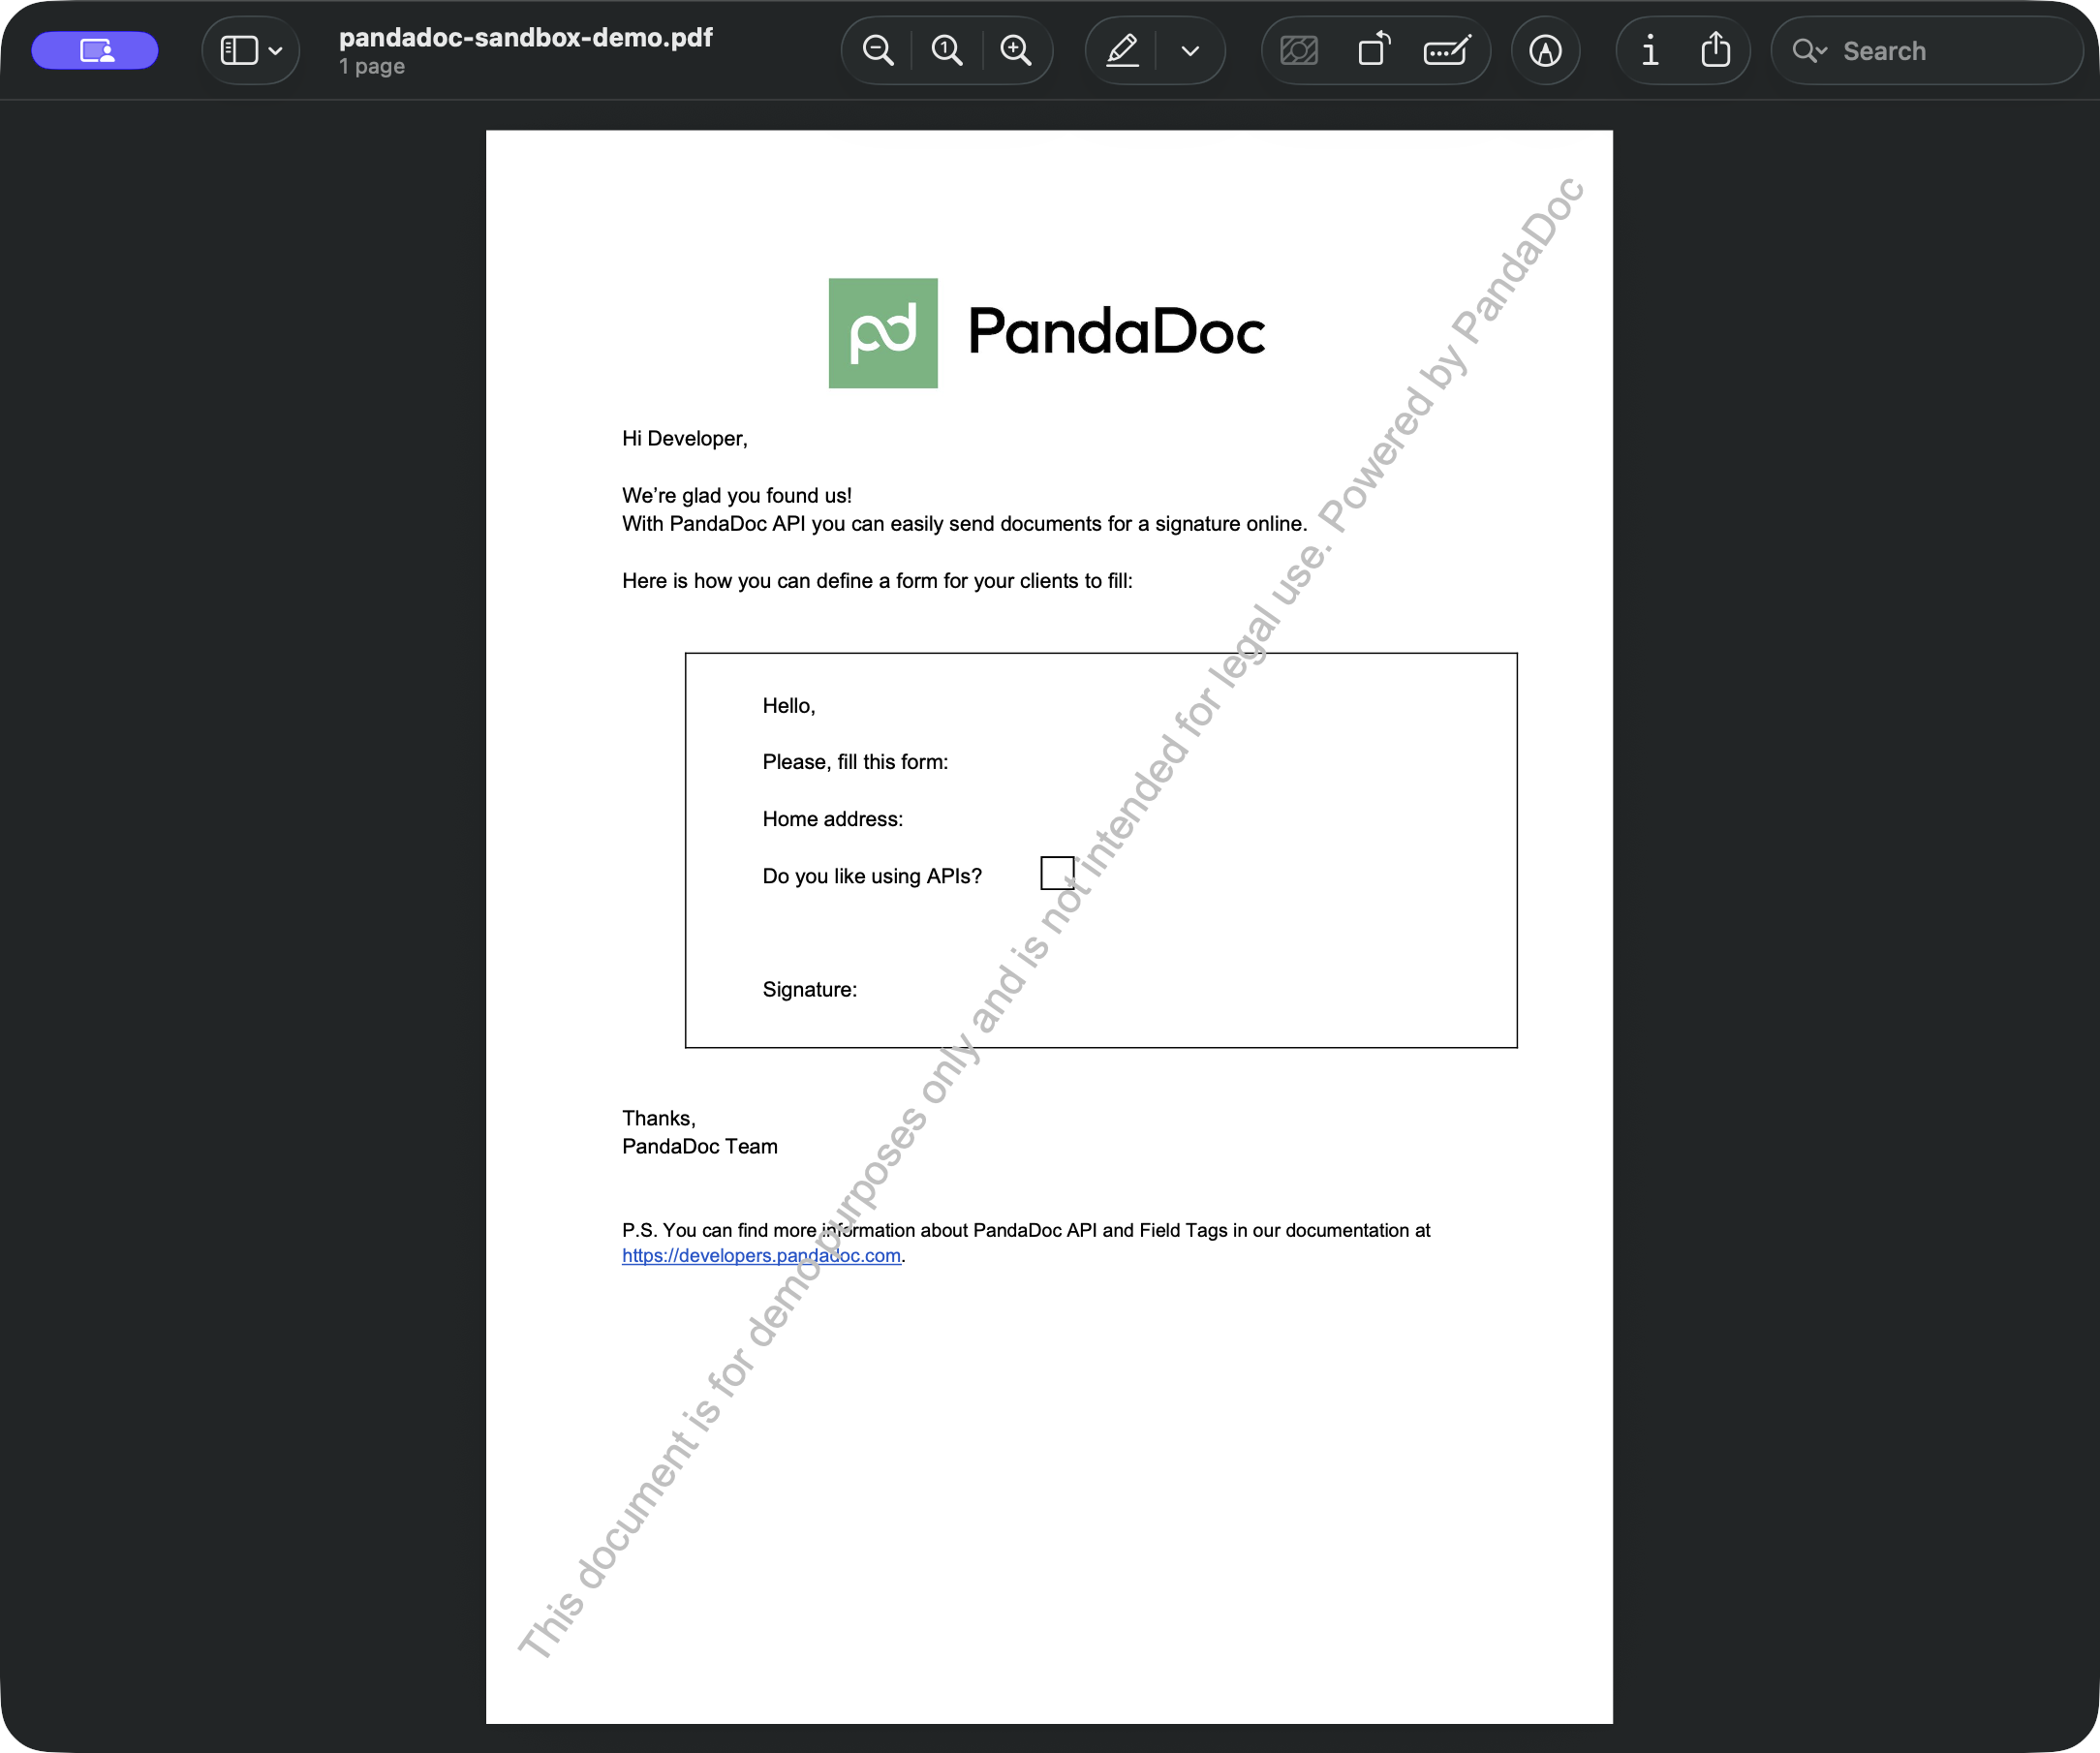
It has reached document dot draft. I open the file and inspect the Sandbox watermark and blank sample fields. This is the concrete output of the approved operation. This draft downloaded successfully.
Other states can behave differently, so check readiness and the permitted download route. Here I remove the HTTPS prefix in an unsaved diagnostic draft. Validation tells me exactly what is wrong. I restore the official HTTPS origin and validate again.
The definition is valid now, but that is not a provider test. I close the unsaved draft, leaving the verified service intact. I create a scheduled task for a small, approved read. This local test requires this computer and uses automatic approval for its bounded operation.
Creating the task inside the project did not attach its folder in this Claude version. I edit the task, choose the exact Outloop folder, and review recurring access. The saved overview must show that local folder. Run now is a diagnostic.
Its fresh receipt shows the intended workspace and a successful PandaDoc read. The saved schedule is our source of truth for the timer. Here is the genuine 3:12 PM history entry, without a Manual label. The timer started this run.
Its separate provider receipt confirms the scheduled run reached Outloop and completed the approved read. I pause the test. Keep this computer awake for future local runs. Here the task belongs to the project, but its session has no connected folder.
It stops instead of guessing where to work. I find the exact folder in Outloop, attach it to the scheduled task, and approve the recurring folder access. Then I run a fresh diagnostic. The successful read tells me the repair worked.
This demonstrates a missing-folder failure; it is not a test against another client’s workspace. The key is stored, but this workspace is not assigned access. Outloop reports SERVICE_NOT_GRANTED before a provider call is made. I assign the existing shared credential to the intended workspace and repeat the approved read.
The new audit result succeeds. There is no reason to paste the key into Claude. I remove the temporary demo assignment when the test is finished. If a schedule fails, start with its saved folder and permissions.
A project name alone did not connect the folder in this test. After attaching the correct folder, I run a diagnostic and check its Outloop result. Then I inspect an actual timer-triggered run. Both must reach the intended workspace.
The 3:12 PM run has its own successful provider read; the manual test alone could not prove that. These are the same recovery and timer evidence shown earlier. So that's the whole check. The folder, the workspace, the assigned access, and the result.
Let the agent do the technical work, keep the credential in Outloop, and always look at what actually happened before you rely on it. Thanks for watching.
Verified with Outloop 1.36.0 and Claude Desktop 1.52386.3 · 2026-09-13. The Sandbox example uses synthetic data; repeat the checks in your own workspace.
Before you start
You’ll need Outloop installed and running, Claude Desktop with Cowork available to your account, a local folder you can write to, and approved access to a provider you can safely test.
Your plan or organization may restrict Cowork, custom Skills, Plugins or scheduling. Check the available controls in your account before following those sections.
Outloop workspace
Policy and runtime identity: which approved access this work can use.
Local folder
The durable shared working boundary. Keep its exact path.
Claude project
Claude’s view of the context. Connect it to that same local folder.
The agent receives approved access, not the raw secret. Enter credentials only in Outloop’s credential UI. Never put them in Claude, prompts, project documents, .env files, Skills, screenshots or generated artifacts.
01
Create your Outloop workspace
Give this project a durable local home before you give your agent access.
Open Overview in Outloop and choose + Create workspace.
Choose Claude / Cowork as the platform.
Enter a synthetic project name for your practice run, such as DEMO PROJECT. Review the proposed Workspace ID.
Review Location and Will create. Use Change… to choose the parent folder if needed.
Choose Create & connect. Wait for Folder ready — connect it in Claude.
Use Copy path, then Reveal in Finder. Keep this exact folder path for the next step.
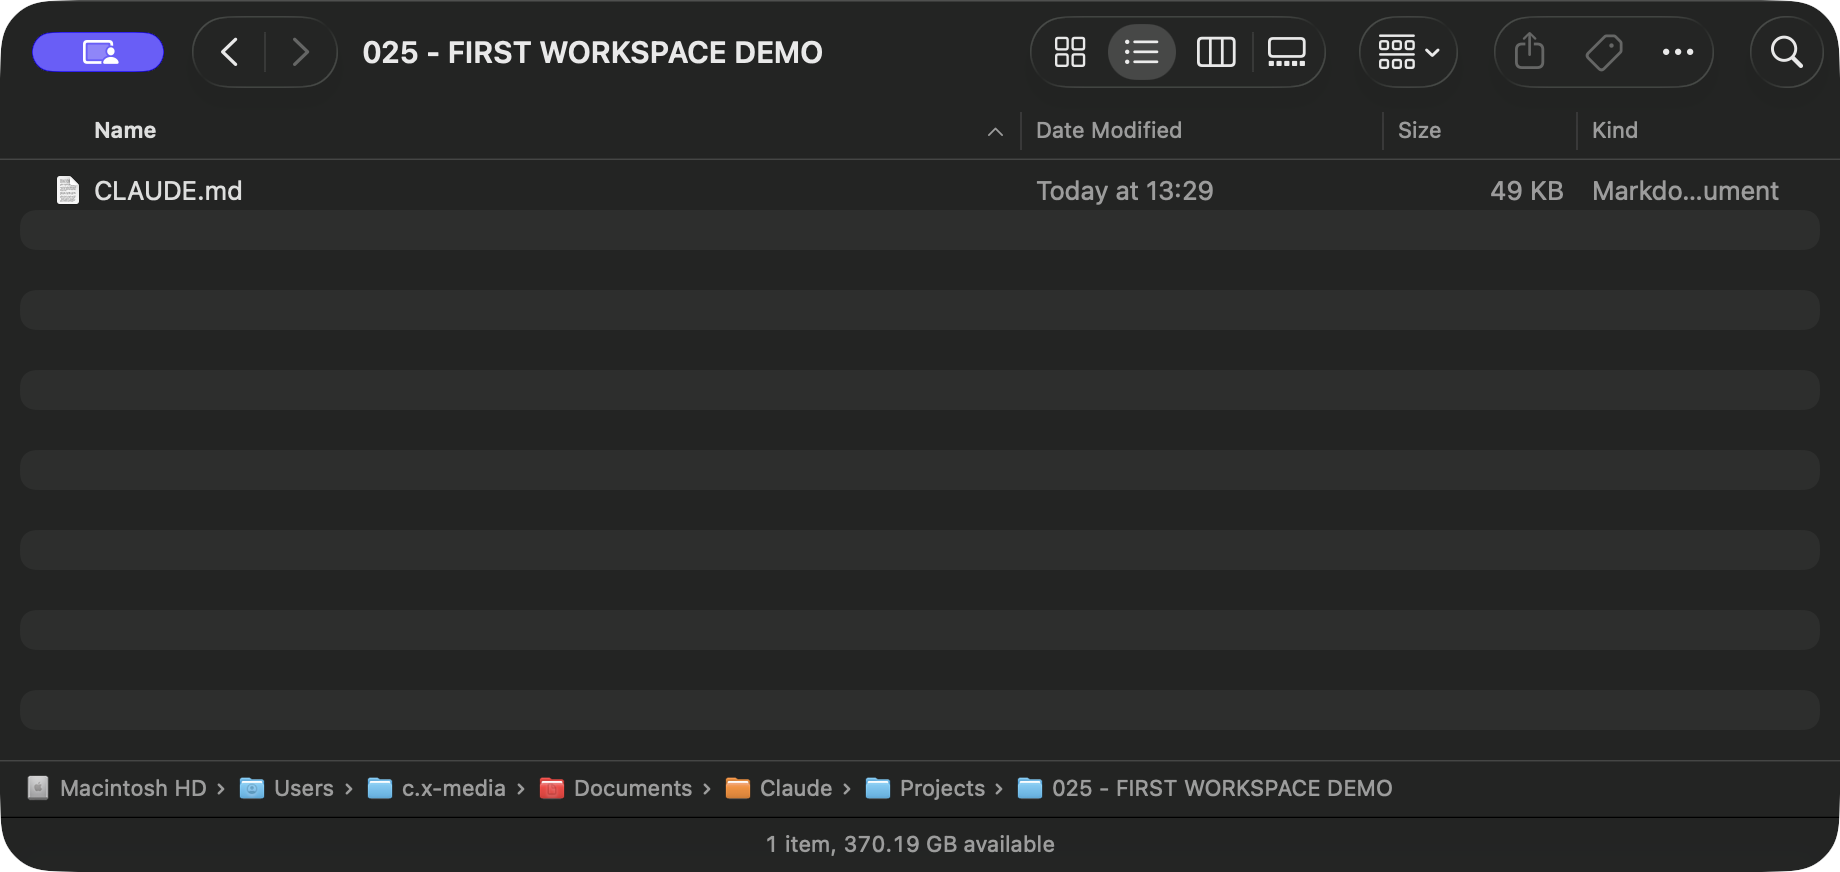
The exact local folder created for demo workspace 025, with Outloop’s workspace instructions inside. Open the image to inspect the full interface.
I’ll start by creating a workspace for this demo. This gives the work a clear home: a specific local folder, with its own approved access. I choose Claude and Cowork, check the name and location, and let Outloop create the folder. Next, I’ll connect that exact folder in Claude.
The folder location is what connects these two apps. I copy it from Outloop and reveal it in Finder. The connection instructions are already inside. Keep this folder: creating another one with the same name would not give Claude the same context.
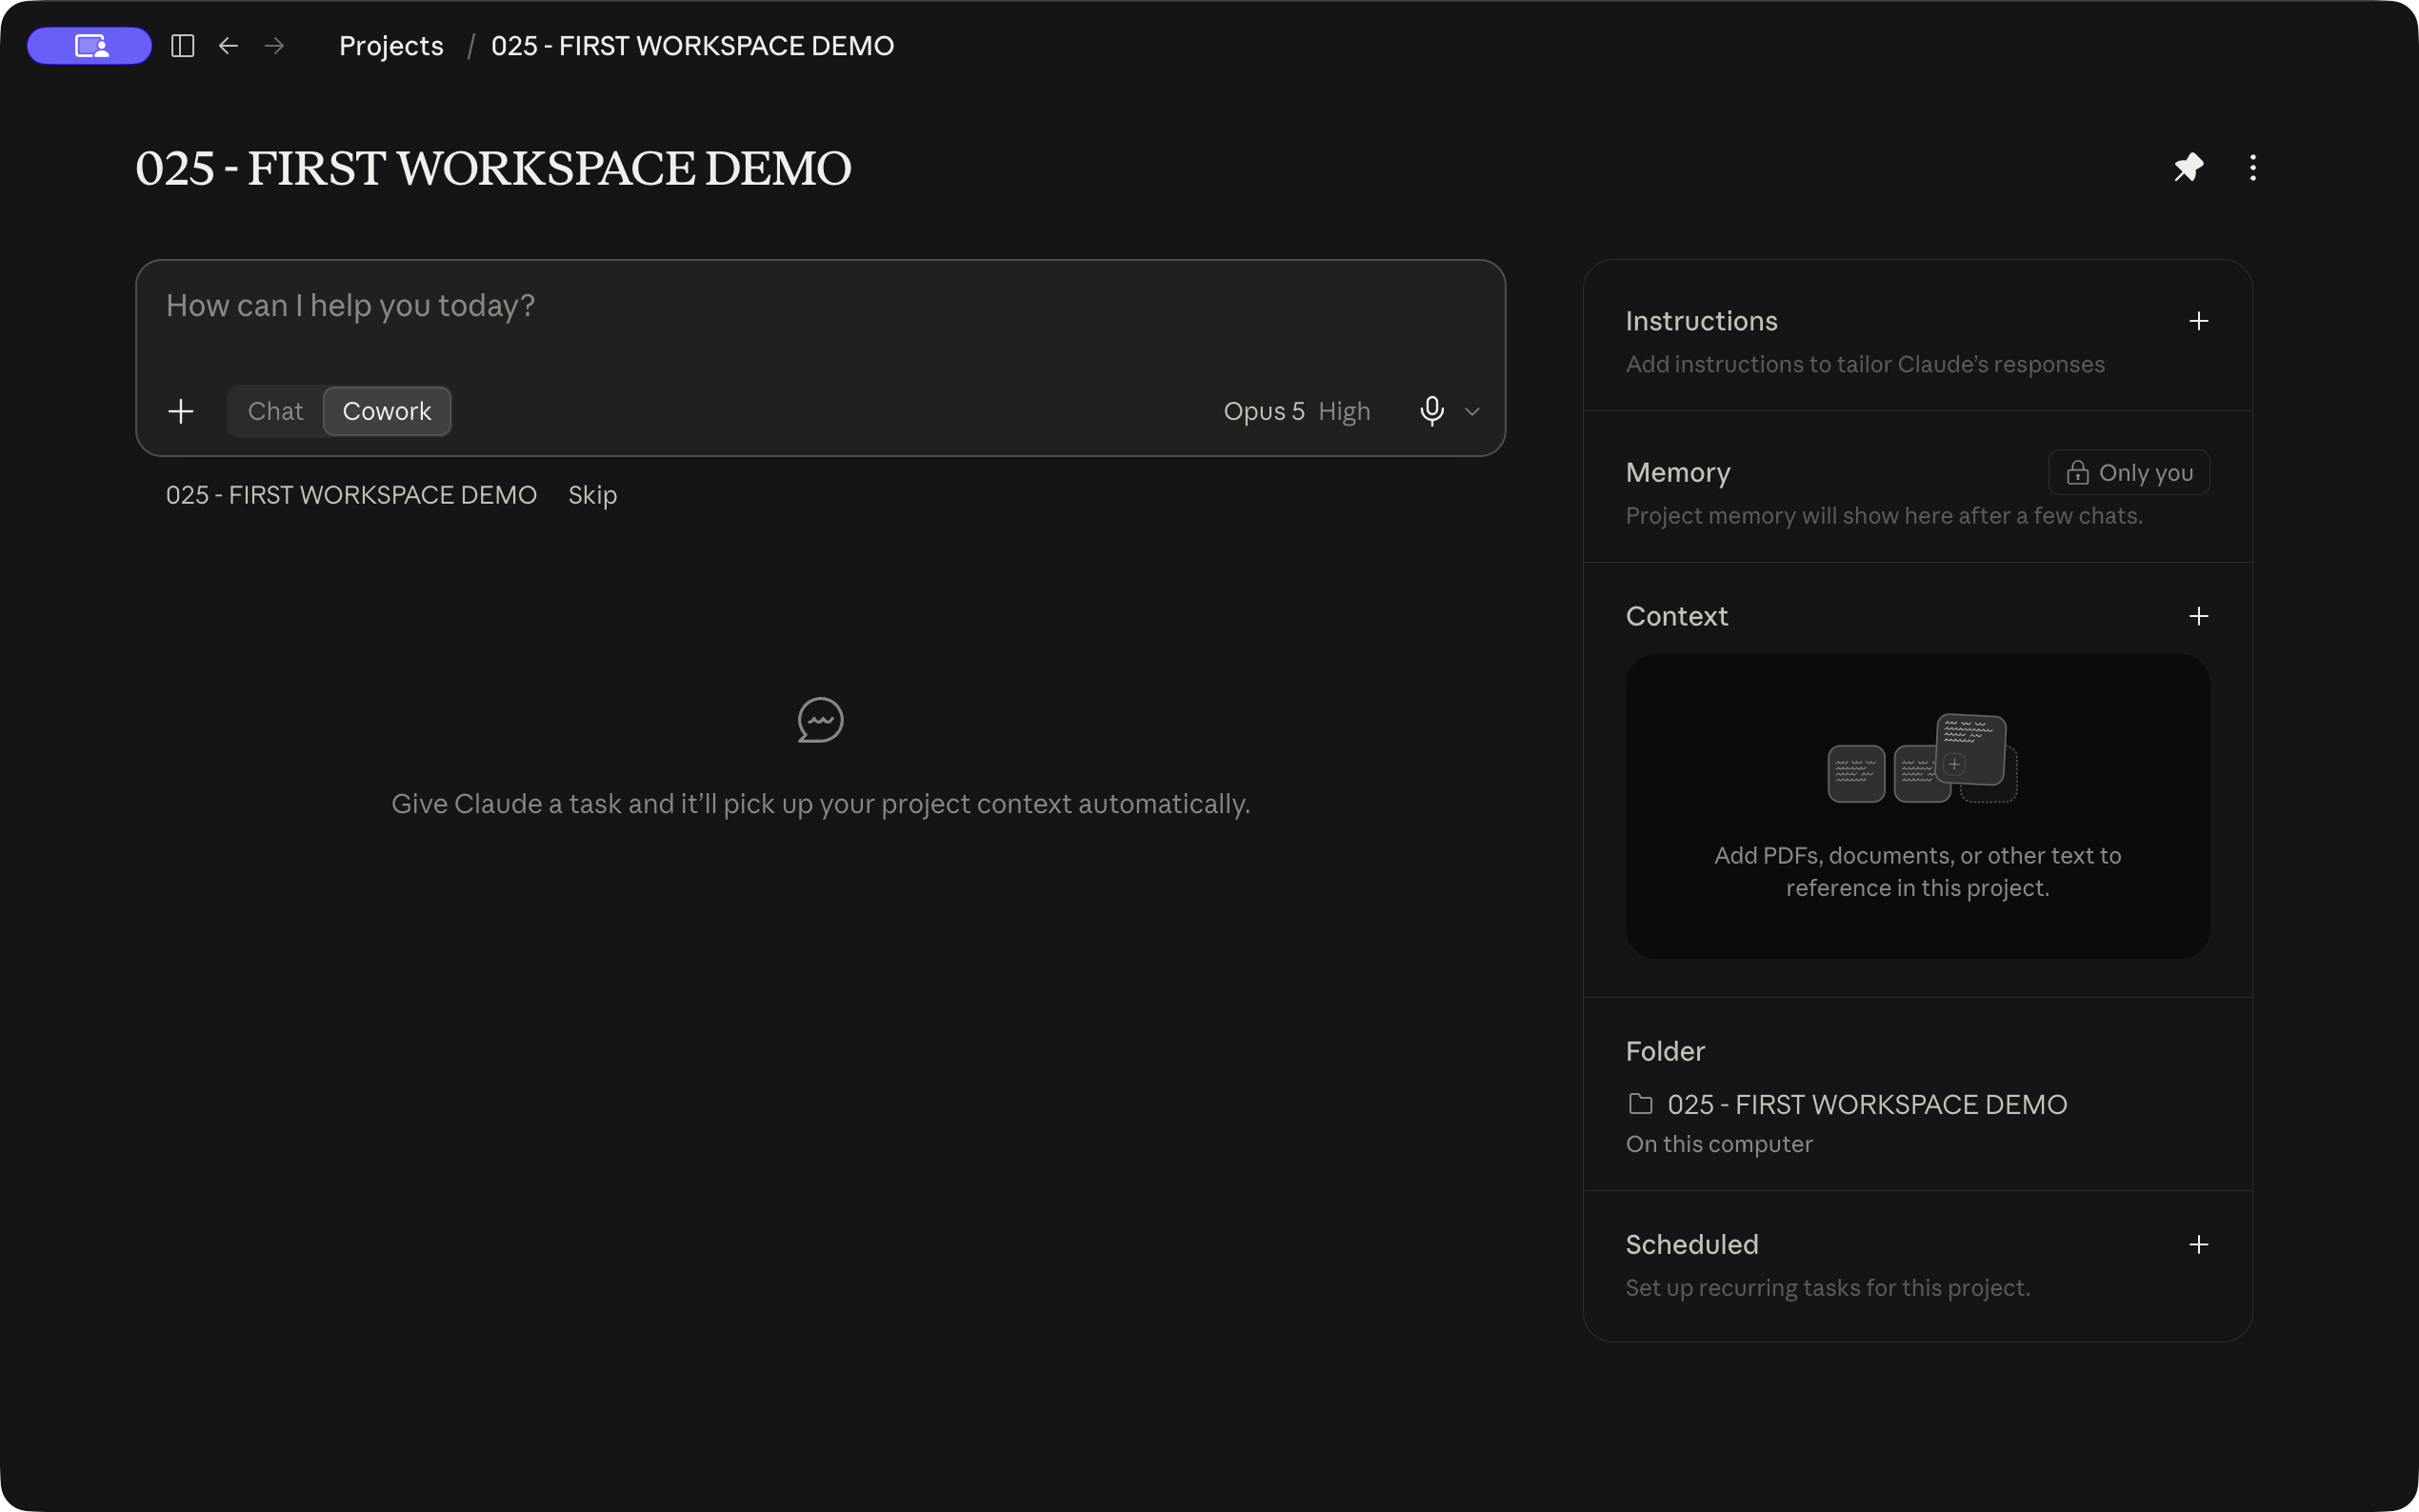
In Claude, I create a project using the folder Outloop just made. I review the permission for that folder and create the project. Then I check that Claude shows the local folder on this computer. That is the connection we need; a matching project name by itself is not enough.
Claude’s project points to the same physical folder as the selected Outloop workspace. A matching name alone does not establish this connection.
Stuck at this step?
I created a project, but Outloop cannot see it.
Check whether the project is cloud-only. Open or create a project using the local folder that Outloop connected. Do not create a second folder with the same name.
Claude is working in the wrong client.
Stop the task. Verify both the selected Outloop workspace and Claude’s exact folder, then start a fresh task in the intended project.
03
Confirm the workspace
Make sure changes to access apply to the project you intend to work on.
Return to Outloop.
Open the global workspace selector.
Search by workspace number, then try the project name.
Select the demo workspace and confirm its ID.
Check the connected folder against the folder selected in Claude.
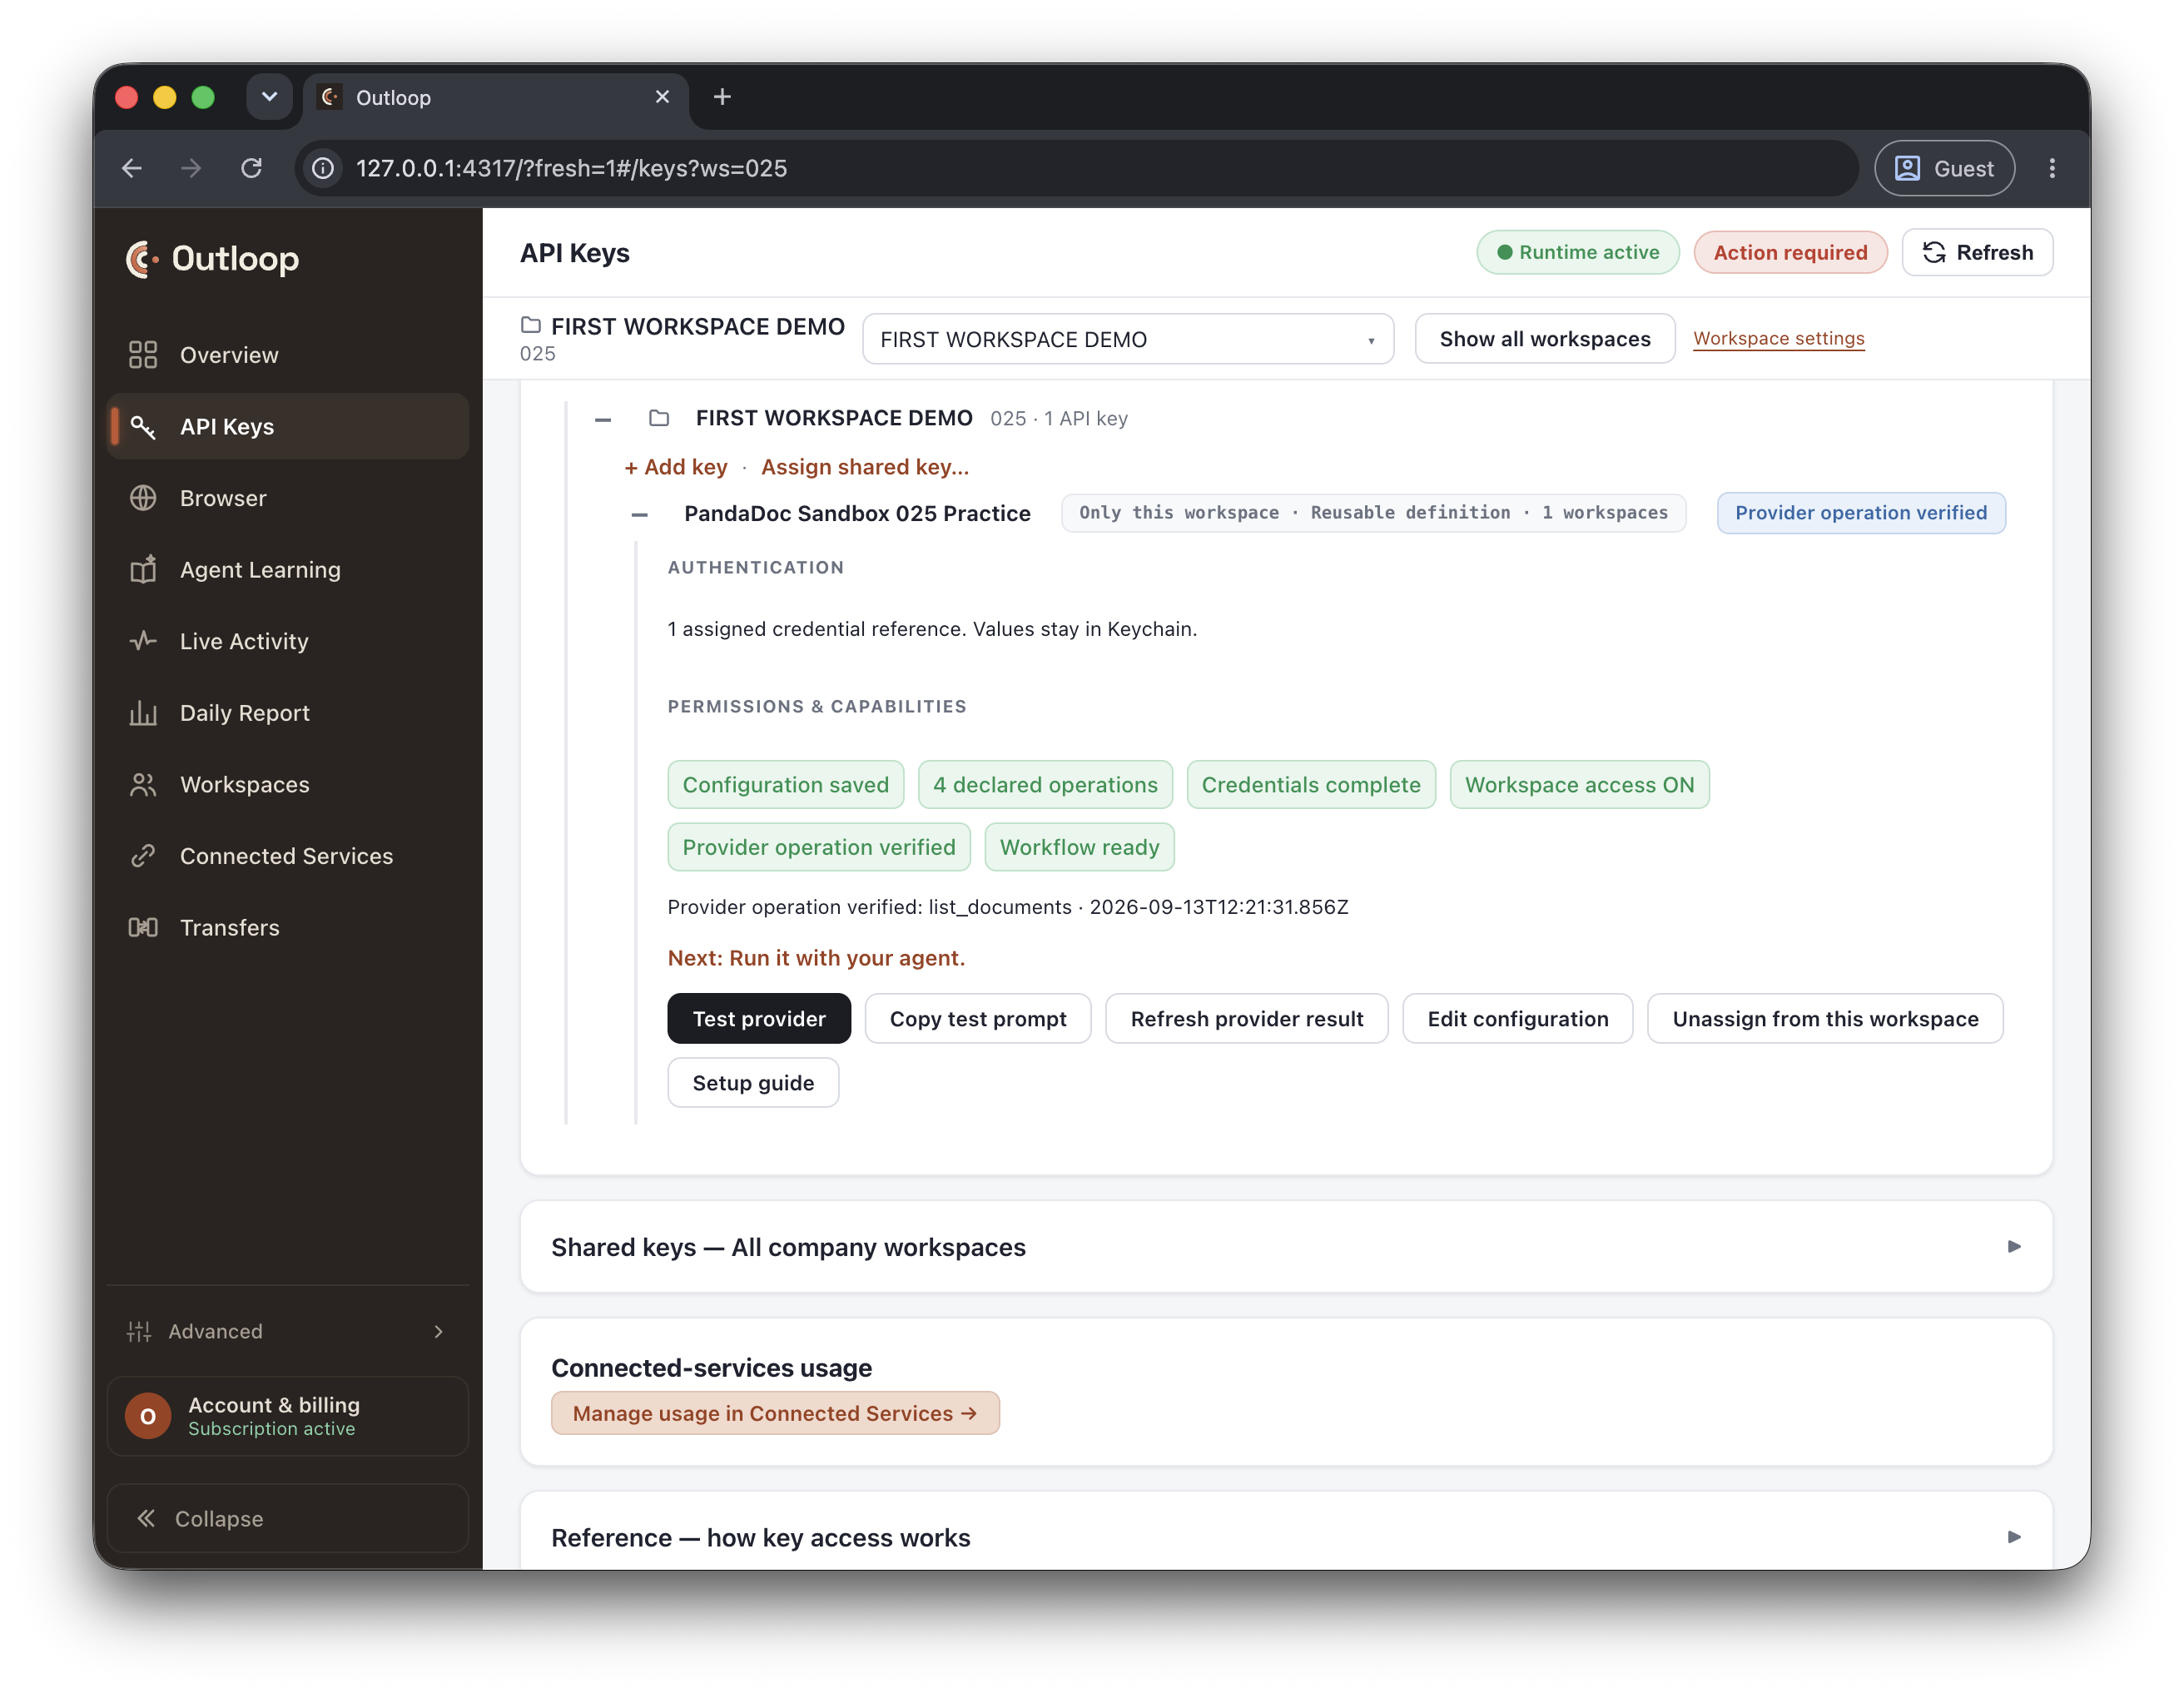
Workspace 025 is selected, with the assigned and provider-verified PandaDoc service visible. Open the image to inspect the full interface.
Before changing access, I check the workspace again. This demo uses workspace 025. Claude’s connected folder and Outloop’s selected workspace need to refer to the same place, so I know exactly where the next action will run.
The workspace-scoped Overview and Claude’s project refer to the intended workspace and folder.
Stuck at this step?
The new workspace does not appear in search.
Reload the Outloop window, then search by number or name again. In the inspected build, a full reload refreshed the selector after creation; the section’s Refresh button did not.
The service is visible in another workspace.
Select this workspace before checking its grants. Access in one workspace does not automatically apply to another.
04
Give it API access
Outloop stores the credential and separately decides which workspace may use it.
Next, install the Runtime Plugin, then the required Skills. Run the first task only after those prerequisites and provider configuration are ready.
Confirm the selected workspace before assigning access.
If a shared key is available, choose Assign for the intended service and review the workspace access.
For a dedicated credential, open Workspace settings → API Keys → + Add API key.
Choose the provider and scope. Read any warning that a shared credential already exists.
Enter the credential only in Outloop’s credential-entry form, then save. Keep screen recording paused throughout entry.
Verify that this workspace has the service assignment or grant. A stored credential by itself is not permission.
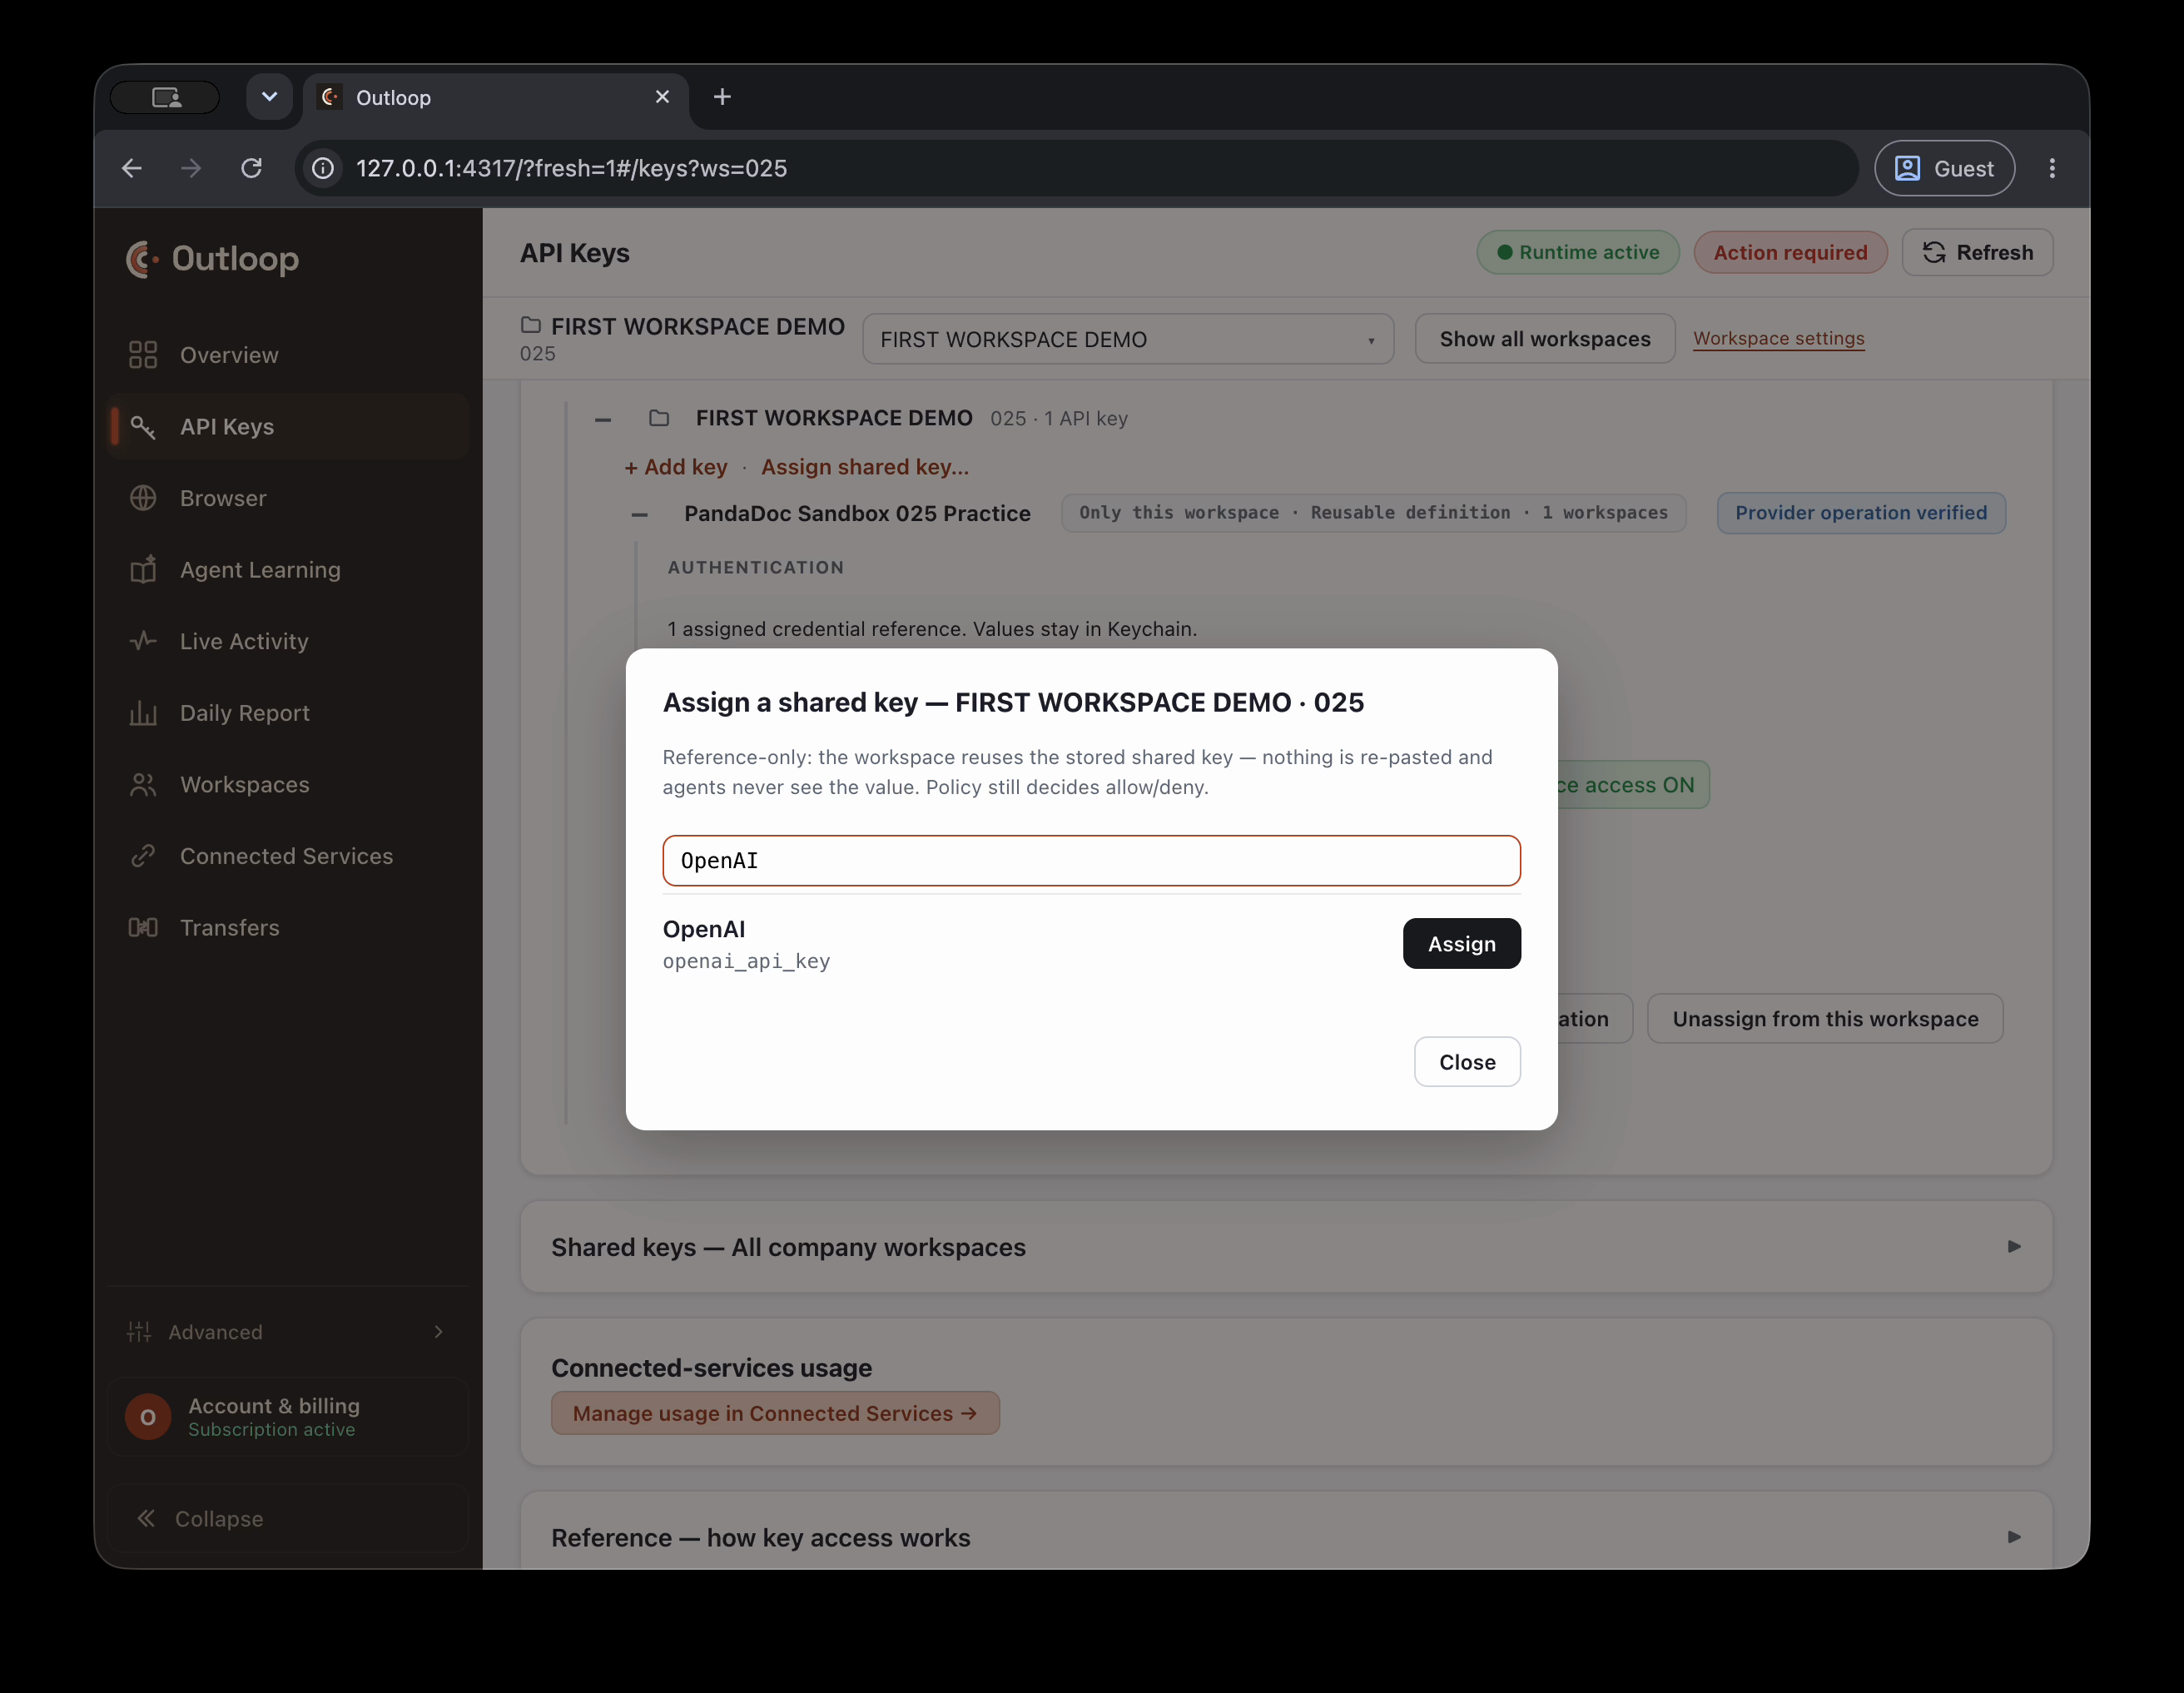
Assign the existing shared OpenAI credential to the selected demo workspace without entering its value again. Open the image to inspect the full interface.
A shared credential can be reused without showing its value. I assign OpenAI to this demo workspace and keep the test to a read-only model-list request. The audit shows that the real request succeeded through Outloop. This was temporary demo access; I removed the assignment after filming.
For a dedicated credential, I confirm the provider and choose only this workspace. I enter the credential privately in Outloop, off-camera. The agent needs the assigned access, not the key. Saving it is one step; we still verify the integration separately.
The key is stored, but this workspace is not assigned access. Outloop reports SERVICE_NOT_GRANTED before a provider call is made. I assign the existing shared credential to the intended workspace and repeat the approved read. The new audit result succeeds.
There is no reason to paste the key into Claude. I remove the temporary demo assignment when the test is finished.
The intended service is assigned to this workspace. The agent receives approved access, not the raw secret.
Stuck at this step?
A shared API is available. Should I add another key?
Use Assign when the existing approved credential is appropriate. Add a dedicated credential only when this workspace should use a separate provider account or credential.
My API exists, but this workspace cannot use it.
Check the grant for the selected workspace. Then verify allowed operations and service configuration. Do not store another credential to work around a missing grant.
The agent asks for the API key.
Stop. Never paste the key into Claude, prompts, files or Skills. Assign access in Outloop and ask the agent to discover the approved service again.
05
Install the Runtime Plugin
A Plugin can bundle several Skills and other capabilities as one installable package.
Once the Runtime Plugin is enabled, continue to the required Skills. Complete provider setup before testing an API operation.
Open the Ollie Runtime Pack download and review its candidate status and installation notes.
In Claude Desktop, open Customize → Plugins → Add plugin → Upload plugin.
Choose the Plugin ZIP and review the preview.
If Claude offers to replace an existing Plugin, compare its version before deciding. Cancel when the intended version is already installed.
Open Ollie Runtime Pack. Check its version, contents and Enable plugin state.
Continue to the required Skills and provider setup. Once those are ready, use a fresh task to verify runtime discovery and an approved workspace operation.
Ollie Runtime Pack is enabled with eight bundled Skills. Installation and use in a fresh task were verified separately. Open the image to inspect the full interface.
The Plugin uses Claude’s Plugin upload route. This package is already present, so I review the replacement before confirming it. Then I check the enabled package and its eight Skills. Installation alone does not prove it works.
The fresh-task footage shows the runtime Skill loading, and the provider receipt shows it was usable. We’ll return to that same read after the API setup chapter.
Ollie Runtime Pack 1.6.0-rc.4 was uploaded, replaced and enabled with eight Skills. A fresh Cowork task loaded its Outloop access Skill and completed the approved PandaDoc read through Outloop.
Stuck at this step?
I downloaded a Plugin but expected a Skill.
Follow the catalog’s package type and use Customize → Plugins. File count does not determine package type. A Skill is a packaged folder with SKILL.md; a Plugin may bundle multiple Skills and additional capabilities.
06
Install the Skills you need
Start with the smallest set that teaches your agent how to perform this workflow.
Open the Outloop Skills Catalog and read the package type, dependencies and current verification labels.
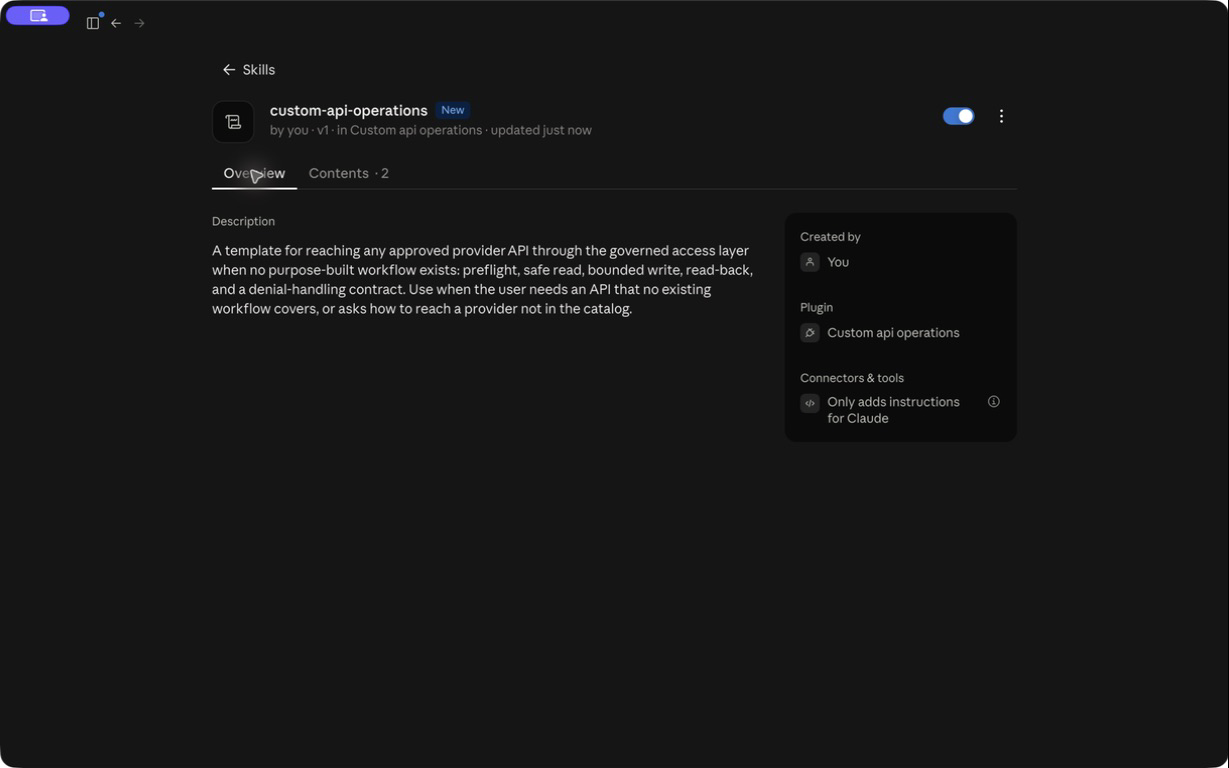
For an approved API without a dedicated workflow, choose Custom API Operations. For configuring a new provider, also choose Outloop Custom API Setup.
Download the complete packaged Skill ZIP. Preserve its supporting files.
In Claude Desktop, open Customize → Skills → Add skill → Upload skill.
Select the package, review its contents and choose Save. Confirm Enable skill is on.
After the Runtime Plugin, required Skills and provider access are configured, start a fresh task in the selected workspace. Verify discovery and a real result separately from installation.
I install the complete Skill package through Claude’s Skills screen, then check that it is enabled. The Skill gives the agent instructions for this workflow. Seeing it installed is the first check; we’ll also test whether the agent actually uses it in a fresh task.
The Skill is installed, enabled and discoverable in a fresh task. The demo loaded a Skill and completed the bounded PandaDoc read with HTTP 200 through Outloop.
Stuck at this step?
The Skill is not visible.
Check Customize → Skills, the completed upload and enabled state. Start a new task after enabling it. Organization policy may restrict custom uploads.
The catalog says the Runtime Pack is required.
Install and verify the separate Ollie Runtime Pack using the Plugin instructions below. Do not infer that importing an individual Skill installs all runtime dependencies.
07
Let your AI agent set up the API for you
You do not need to understand every Custom API field. Install the Custom API Skill and tell your agent which service. The agent prepares everything; you create the API key at the provider and paste it into Outloop once, when the agent asks. The agent finishes and verifies the connection without ever seeing the secret.
Outloop Custom API Setup
Primary setup Skill · v1.1.1 · Candidate
Guides provider research, authentication, configuration in Outloop, operation definitions, supported async jobs and files, and integration verification.
Imported, enabled and activated in the guide’s Cowork demo. The agent created a PandaDoc practice integration, reused the credential entered securely by the user, corrected validation errors and verified a real bounded read through Outloop.
Download it here and add it to Claude, Claude Code or Codex. One time.
YouTell your agent which service
For example: “Connect Higgsfield to this workspace.” The agent researches the provider and prepares the whole configuration in Outloop.
You, onceCreate and paste the key once
The agent can open the provider’s API key page. You create the key there and paste it into Outloop’s secure field. The agent never sees it.
AgentThe agent finishes and verifies
It enables the approved capabilities, runs a low-risk real request and reports the service working through Outloop.
Download the Outloop Custom API Setup Skill ZIP above. The two companion Skills are optional; the recorded demo installed all three. Keep each package’s supporting files together.
In Claude or Cowork, open Customize → Skills → Upload a skill, choose the ZIP, then enable it. Review each package before enabling it.
Start a fresh Cowork task in the project connected to the exact Outloop folder. An installed Skill and a working integration are separate checks.
Copy the starter request below. The agent asks which service; for this guide, answer PandaDoc Sandbox and ask for a harmless read of synthetic demo data.
Let the agent research the official API and prepare the configuration through the approved Outloop browser path. When the key is needed it offers to open the provider’s API key page; you create the key there and paste it directly into Outloop. Existing workspace policy and required approvals still apply.
If a credential is required, enter it only in Outloop’s secure form. Keep recording stopped during entry; resume after the secure stored state is shown.
Let the agent finish configuration, preflight the approved operation, and run it. Ask for the provider result and matching Outloop evidence; a save or preflight is not completion.
Use the Outloop Custom API Setup Skill to connect a service to this workspace. Ask me which service, prepare everything, and when the API key is needed, tell me where to create it — I will paste it into Outloop myself.
Send it as written: the agent asks which service. You can also name it, for example “Connect PandaDoc to this workspace.” The PandaDoc example uses synthetic sandbox data and a bounded read. Only configure additional operations when your task and workspace permissions support them.
You do not have to understand every API field yourself. I download three Skills from the guide. Outloop Custom API Setup helps the agent prepare the integration. API Integration Development supports the technical research.
Custom API Operations guides approved work after setup. Keep the complete ZIP packages for installation. These are the catalog versions tested in this recording; their candidate status still matters. I use Claude’s Skills upload route and select the complete ZIP.
Keep the package zipped. I review Outloop Custom API Setup and save it. Claude checks the package before installation. This recording replaces an existing copy.
I check the intended package, confirm replacement and verify it is enabled. I repeat the upload for API Integration Development and check its enabled state. The catalog package version is different from Claude’s revision number. Finally, I install Custom API Operations.
With all three enabled, I start a fresh task in the connected folder to test actual activation and use.
Now I tell the agent the outcome I want: set up PandaDoc Sandbox for this Outloop workspace, research the official documentation, and verify a small, approved operation. I ask it to use the installed Skills. If it needs a credential, it must ask me to enter it directly in Outloop. The prompt contains no key.
The agent checks PandaDoc’s official documentation before configuring anything. Here it confirms the Sandbox restrictions and that creating a draft is separate from sending it. That distinction keeps this demo’s approval narrow.
The agent prepares the integration through Outloop. Here we review the definition it produced: the official destination, authentication template, and limited operations. Outloop holds the credential; the agent works with its assigned reference. This is an edited review of the completed configuration.
The secure handoff comes next as an explanation of the human-only step, not a second credential entry.
I confirm the provider and workspace. The credential is entered only in Outloop, with recording stopped. After it is saved and assigned, the agent continues without seeing it. Never paste the key into Claude.
Here is the same first-task receipt again: workspace 025, the matching request, HTTP 200, and no secret exposure reported. I hold it here so we can inspect the result.
The required Skills are enabled and active in a fresh task. The agent prepares the intended integration, pauses only for necessary human input or approval, and returns a real provider result with matching Outloop evidence and no secret exposure. The PandaDoc demo verified this setup sequence with a bounded read; other provider operations need their own checks.
Stuck at this step?
A setup Skill is not visible.
Open Customize → Skills, check the imported package name and confirm Enable skill is on. Upload the complete Skill ZIP through Upload skill. Keep Plugin packages on the separate Plugins route.
The Skill is installed but does not activate.
Start a fresh task after installation. Name the relevant Skill and the intended provider outcome in the request. Check which Skills the agent actually loaded; installation alone does not prove activation.
Claude is in the wrong workspace or folder.
Stop configuration. Select the exact local folder connected by Outloop and start a fresh task. Confirm Outloop’s workspace identity before changing any configuration.
The agent cannot find Outloop.
Open the installed Outloop app and confirm the local runtime and approved browser path are available to this task. Recheck the connected folder. Report the exact access error; do not substitute another workspace or direct provider access.
The provider documentation is unclear.
Ask the agent to identify the unclear authentication, endpoint or operation in the official documentation. Keep uncertain operations unconfigured until the contract is established. Do not guess a provider URL or invent a successful result.
Custom API validation fails.
Read the exact validation message and correct the named field. Use explicit query bindings and Outloop’s typed parameter format. Validate and save again, then repeat the real provider test.
The credential is stored but not assigned.
Select the intended workspace in Outloop, assign the existing credential reference to the service, and confirm the workspace operation is enabled. Then repeat preflight and the safe real operation.
The operation is not allowed.
Use an operation declared and approved for this workspace with its required parameters. Ask the agent to use Outloop’s generated test prompt. Do not widen permissions or bypass Outloop merely to remove a denial.
An async or file operation needs more configuration.
Configure the supported start, status and retrieval operations, carry the provider’s returned ID, and wait for a completed result. Verify the workspace file receipt. A queued job or HTTP success alone does not prove the file is ready.
The agent asks for my API key.
Do not paste it. Enter it only through Outloop’s secure credential UI. Tell the agent to continue using the stored credential reference through Outloop, without seeing the value.
08
Connect a Custom API
Use PandaDoc’s real sandbox to learn the same model used for other approved providers.
Select the demo workspace in Outloop and open its API Keys and Access view.
Choose + Add API key, open the service selector, and choose + Add a custom service. The current setup screen is Connect a Custom API.
Review the provider documentation and base URL https://api.pandadoc.com. Sandbox authentication uses the normal provider endpoint; do not invent a sandbox hostname.
Choose API key / custom header. PandaDoc uses the header name Authorization and the template API-Key {{secret}}; Outloop supplies the secret securely. Continue to configuration.
Assign an approved sandbox credential or enter it only through Outloop’s secure credential form with recording stopped.
In the Custom API editor, define a read-only GET operation for /public/v1/documents. Put query values in explicit parameter bindings, validate and save. Confirm its workspace grant before testing.
Let’s look at what the agent prepared. The connection uses PandaDoc’s HTTPS API origin, and the authentication template refers to a credential kept in Outloop. The read operation defines its path, inputs and response type. Here the query is constrained to our synthetic demo.
Validate checks the definition, without calling PandaDoc. I’m reviewing the existing integration, so I close this inspection without saving unnecessary changes.
Validation checks the corrected definition without calling the provider. The agent saves the configuration and preflights the workspace’s allowed operation. Then a real provider request checks whether the integration actually works. Outloop shows the saved configuration, assigned credential and fresh provider verification.
Match that evidence to the intended operation and workspace.
The configuration has a reviewed destination, authentication method and bounded operations, and the intended workspace can use the approved alias without seeing a secret.
Stuck at this step?
My authentication scheme is not available.
Check the installed Outloop version and the provider’s exact requirements. Do not put an Authorization value into a prompt or request file to compensate for unsupported configuration.
An OpenAPI import will not apply: map the required security scheme, or many rows need a manual parameter definition.
The specification asks for a sign-in method or schema shapes the importer cannot express. See When the official specification won’t apply in the Custom API guide (/guides/connect-custom-api-to-outloop#spec-wont-apply): your agent can define those operations manually or import a reduced copy that keeps the official paths, methods and operation IDs.
The row or the Test provider dialog still shows the old definition after Save.
Reload the API Keys view, then open Test provider from the service row. The row and the dialog refresh from the saved definition on reload.
09
Test the Custom API end to end
Configuration becomes useful only after the provider operation and its evidence succeed.
Return to the same local Claude project and use the installed Custom API Operations Skill.
After saving the configuration, reload the API Keys view, then open Test provider from the service row. Select the declared read operation (list_documents in the practice demo), Count 1, and the synthetic Q value, then choose Copy test prompt to generate the prepared request. Finish any definition changes before this final proof.
Paste that generated prompt into the same local Claude project. It names the declared operation and required parameters without a credential. Run it through Outloop; do not reconstruct a raw provider request.
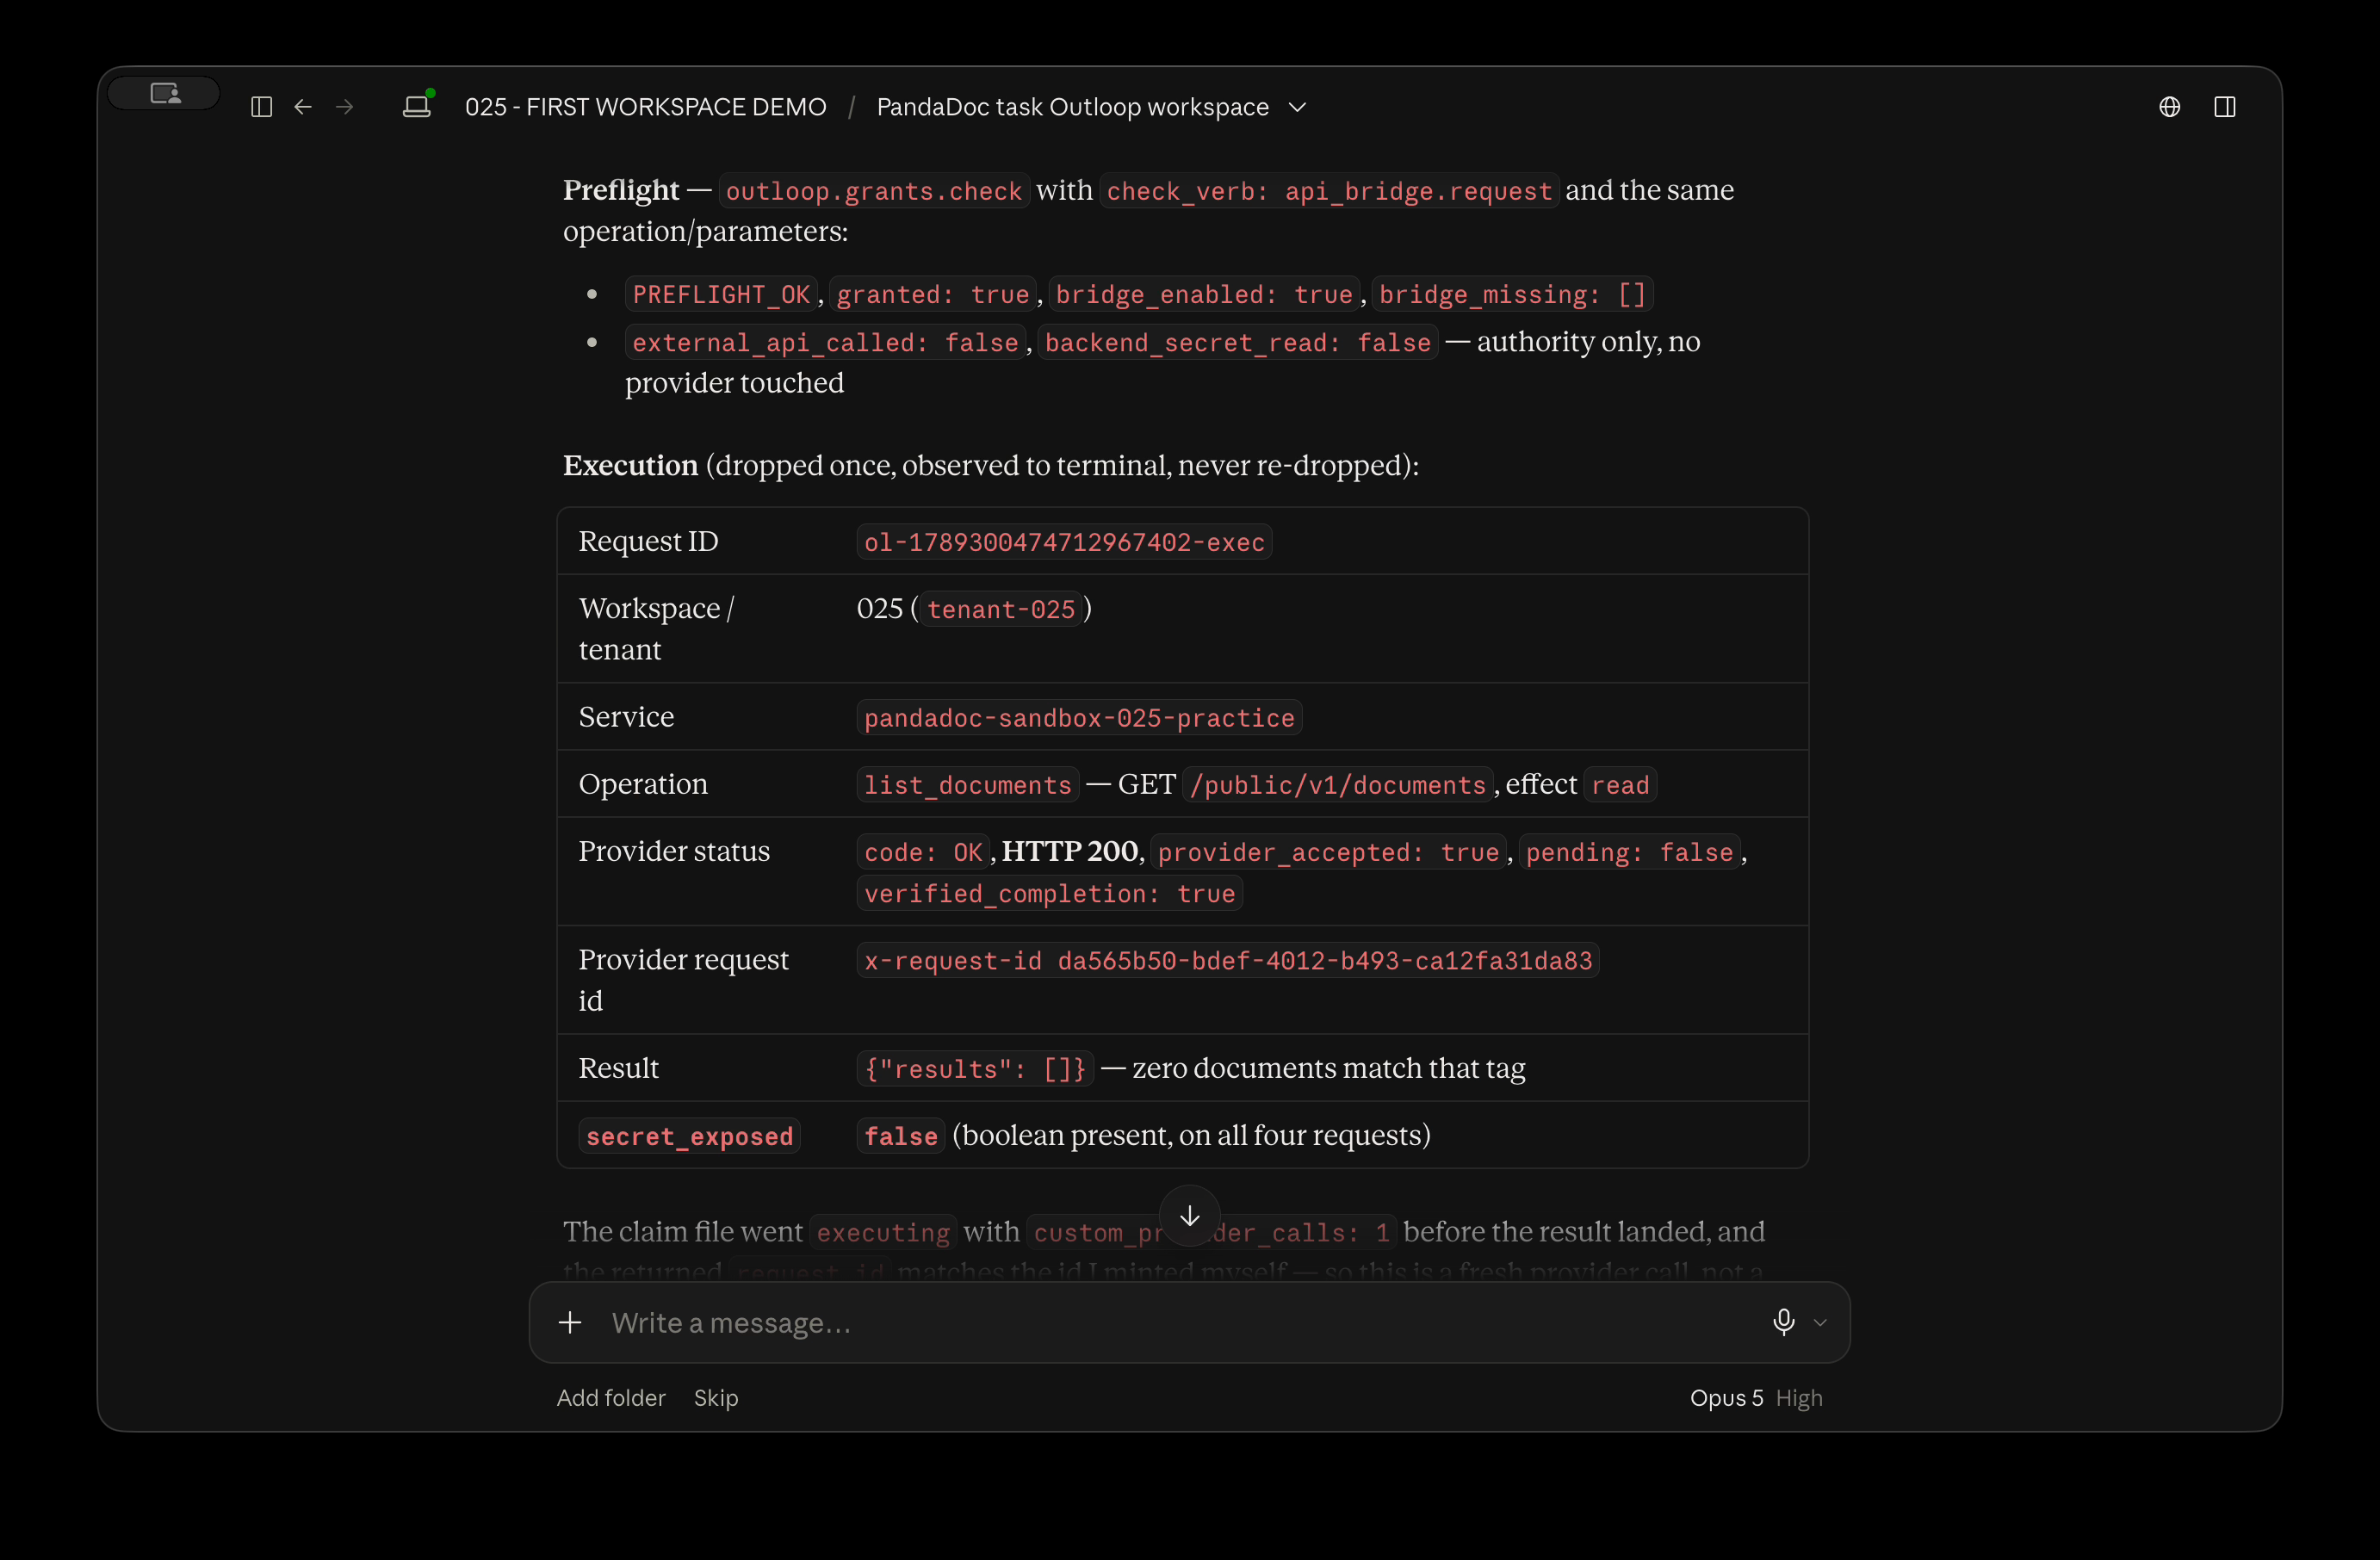
Match the provider success with the Outloop audit receipt, including workspace and secret_exposed: false.
After the read succeeds, ask the setup agent to configure a separate, approved synthetic draft workflow. Our test used PandaDoc’s public sample PDF and a synthetic recipient. Creation, status and download were separate operations; status/download were pinned to the one returned document ID.
Read the new document’s status until it is ready or reports an error, respecting provider retry limits. Retrieve the PDF through Outloop’s Save as file response and verify its receipt. Our tested draft downloaded successfully; do not send or sign a document just to force a download.
The real downloaded PandaDoc sample PDF opens locally, with a Sandbox watermark and blank demo fields. Nothing was sent or signed. Open the image to inspect the full interface.
Two narration lines are silent in the Custom API test sequence. The screen recording and on-screen captions continue through both gaps.
Read the transcript
The test panel prepares a request for one declared operation. Here I choose the bounded demo inputs and copy the generated prompt. Copying it does not call PandaDoc. The connected Cowork task provides the real read receipt.
I check the workspace, request and HTTP 200 result. This receipt is reused from the first-task demonstration. The agent checks that exact document’s state. It has reached document dot draft.
I open the file and inspect the Sandbox watermark and blank sample fields. This is the concrete output of the approved operation. This draft downloaded successfully. Other states can behave differently, so check readiness and the permitted download route.
Here I remove the HTTPS prefix in an unsaved diagnostic draft. Validation tells me exactly what is wrong. I restore the official HTTPS origin and validate again. The definition is valid now, but that is not a provider test.
I close the unsaved draft, leaving the verified service intact.
The live demo created one synthetic draft (HTTP 201), read its status as document.draft, and downloaded a PDF through Outloop (HTTP 200). The file size and checksum matched its receipt. Nothing was sent or signed. This proves the tested Sandbox workflow, not every provider or document type.
Stuck at this step?
The router says BRIDGE_OPERATION_NOT_ALLOWED.
Take the operation ID from the saved configuration, never from memory or the provider’s docs. Return to Test provider → Copy test prompt, select the declared operation, and supply every required parameter. Paste the generated prompt into the same local project. Do not guess an adapter verb or append query values to a raw path.
Authentication or access is denied.
Check the exact denial, assigned alias, credential scope and authentication configuration in Outloop. Do not retry through another transport or paste the credential into Claude.
Test provider lists old operations, or says workspace access is off after you enabled it.
Reload the API Keys view, then open Test provider from the service row. Opened straight from the editor, the dialog can still show the previous definition.
A verified service refuses one endpoint with a plan or token-type message.
That endpoint needs a higher provider plan or a different kind of token. The configuration is fine: keep the operation declared; it starts working once the plan or token changes. Report it as an external prerequisite.
I want to prove write access without changing anything.
Ask the agent for an idempotent write: re-save a draft or unpublished record with the value it already has. The provider accepts the write and nothing visible changes. The agent asks before touching live content.
A document is still processing or cannot be downloaded.
Follow the provider’s documented status and retry rules. A created draft does not prove that a downloadable artifact is available. Keep the task bounded and report the actual state.
10
Run your first AI task (when ready)
A real, harmless provider operation proves the entire connection works.
Only do this now if the required Runtime Plugin, Skills and provider access are already configured. If any prerequisite is missing, complete Runtime Plugin → required Skills first, then return here. For a new PandaDoc integration, complete agent-assisted setup before this task.
In the intended Outloop workspace, choose Copy workspace run prompt.
Return to the Claude project attached to the same folder and start a fresh task.
Paste the copied workspace prompt. It must contain no credential.
Request a read-only verification for the assigned service using the prompt below.
Wait for the actual provider result. An access check or preflight alone is not success.
Open the corresponding Outloop activity or audit evidence and match its workspace, service, operation and request identifier to the agent’s result.
A safe first request
Use this task’s connected local workspace. Fetch its approved Outloop context and discover its assigned services. For the service I selected, perform one harmless read-only provider operation through Outloop. Do not create, send, delete or modify provider data. Report the actual workspace identity, service alias, operation, result and matching Outloop request or audit identifier. Preflight alone is not success. Never request, reveal or store a credential.
The real PandaDoc sandbox read returned HTTP 200 through Outloop in workspace 025, with secret_exposed: false. The synthetic search matched zero documents. Open the image to inspect the full interface.
Now I ask for a small, approved PandaDoc read in the connected folder. Claude checks the workspace and its access before making the request. I match the result to the request and workspace. HTTP 200 confirms the read succeeded; an empty list is a valid result.
Outloop’s receipt reports no secret exposure.
A provider operation succeeded through Outloop, with matching workspace evidence and secret_exposed: false. No raw credential appears in the conversation or output.
Stuck at this step?
Preflight passed, but the task failed.
Read the actual provider or Outloop denial. Preflight checks policy, not the provider result. Correct the named issue and repeat only the safe operation.
Outloop’s runtime is unavailable.
Return to Outloop and check runtime readiness for this folder. Restore the local runtime, then retry from the same project. Do not switch to a direct API call.
11
Schedule recurring work
A scheduled task needs the same proven access as an interactive task.
Open Scheduled, or use Add scheduled task inside the intended project.
Enter a synthetic name and safe read-only instructions. Require a fresh operation and new evidence for each invocation; an earlier report must not substitute for this run. Review Frequency and Permissions.
Enable Require this computer for the local Outloop workflow. Keep Claude Desktop, the Mac and Outloop available.
Save, then open Edit and inspect Folder. A project association alone did not attach the local folder in our test.
Choose the exact Outloop folder and confirm its use for each run. Verify that the schedule lists Folders On Claude Desktop (macOS) as well as the project.
First use Run now as a diagnostic and verify a fresh provider receipt. Then allow one scheduled execution to occur. Verify its actual folder, workspace, provider result and matching Outloop audit; Run now alone does not prove the timer.
Pause the synthetic schedule after verification. Keep a fresh provider operation and new receipt as the success requirement for each recurring run.
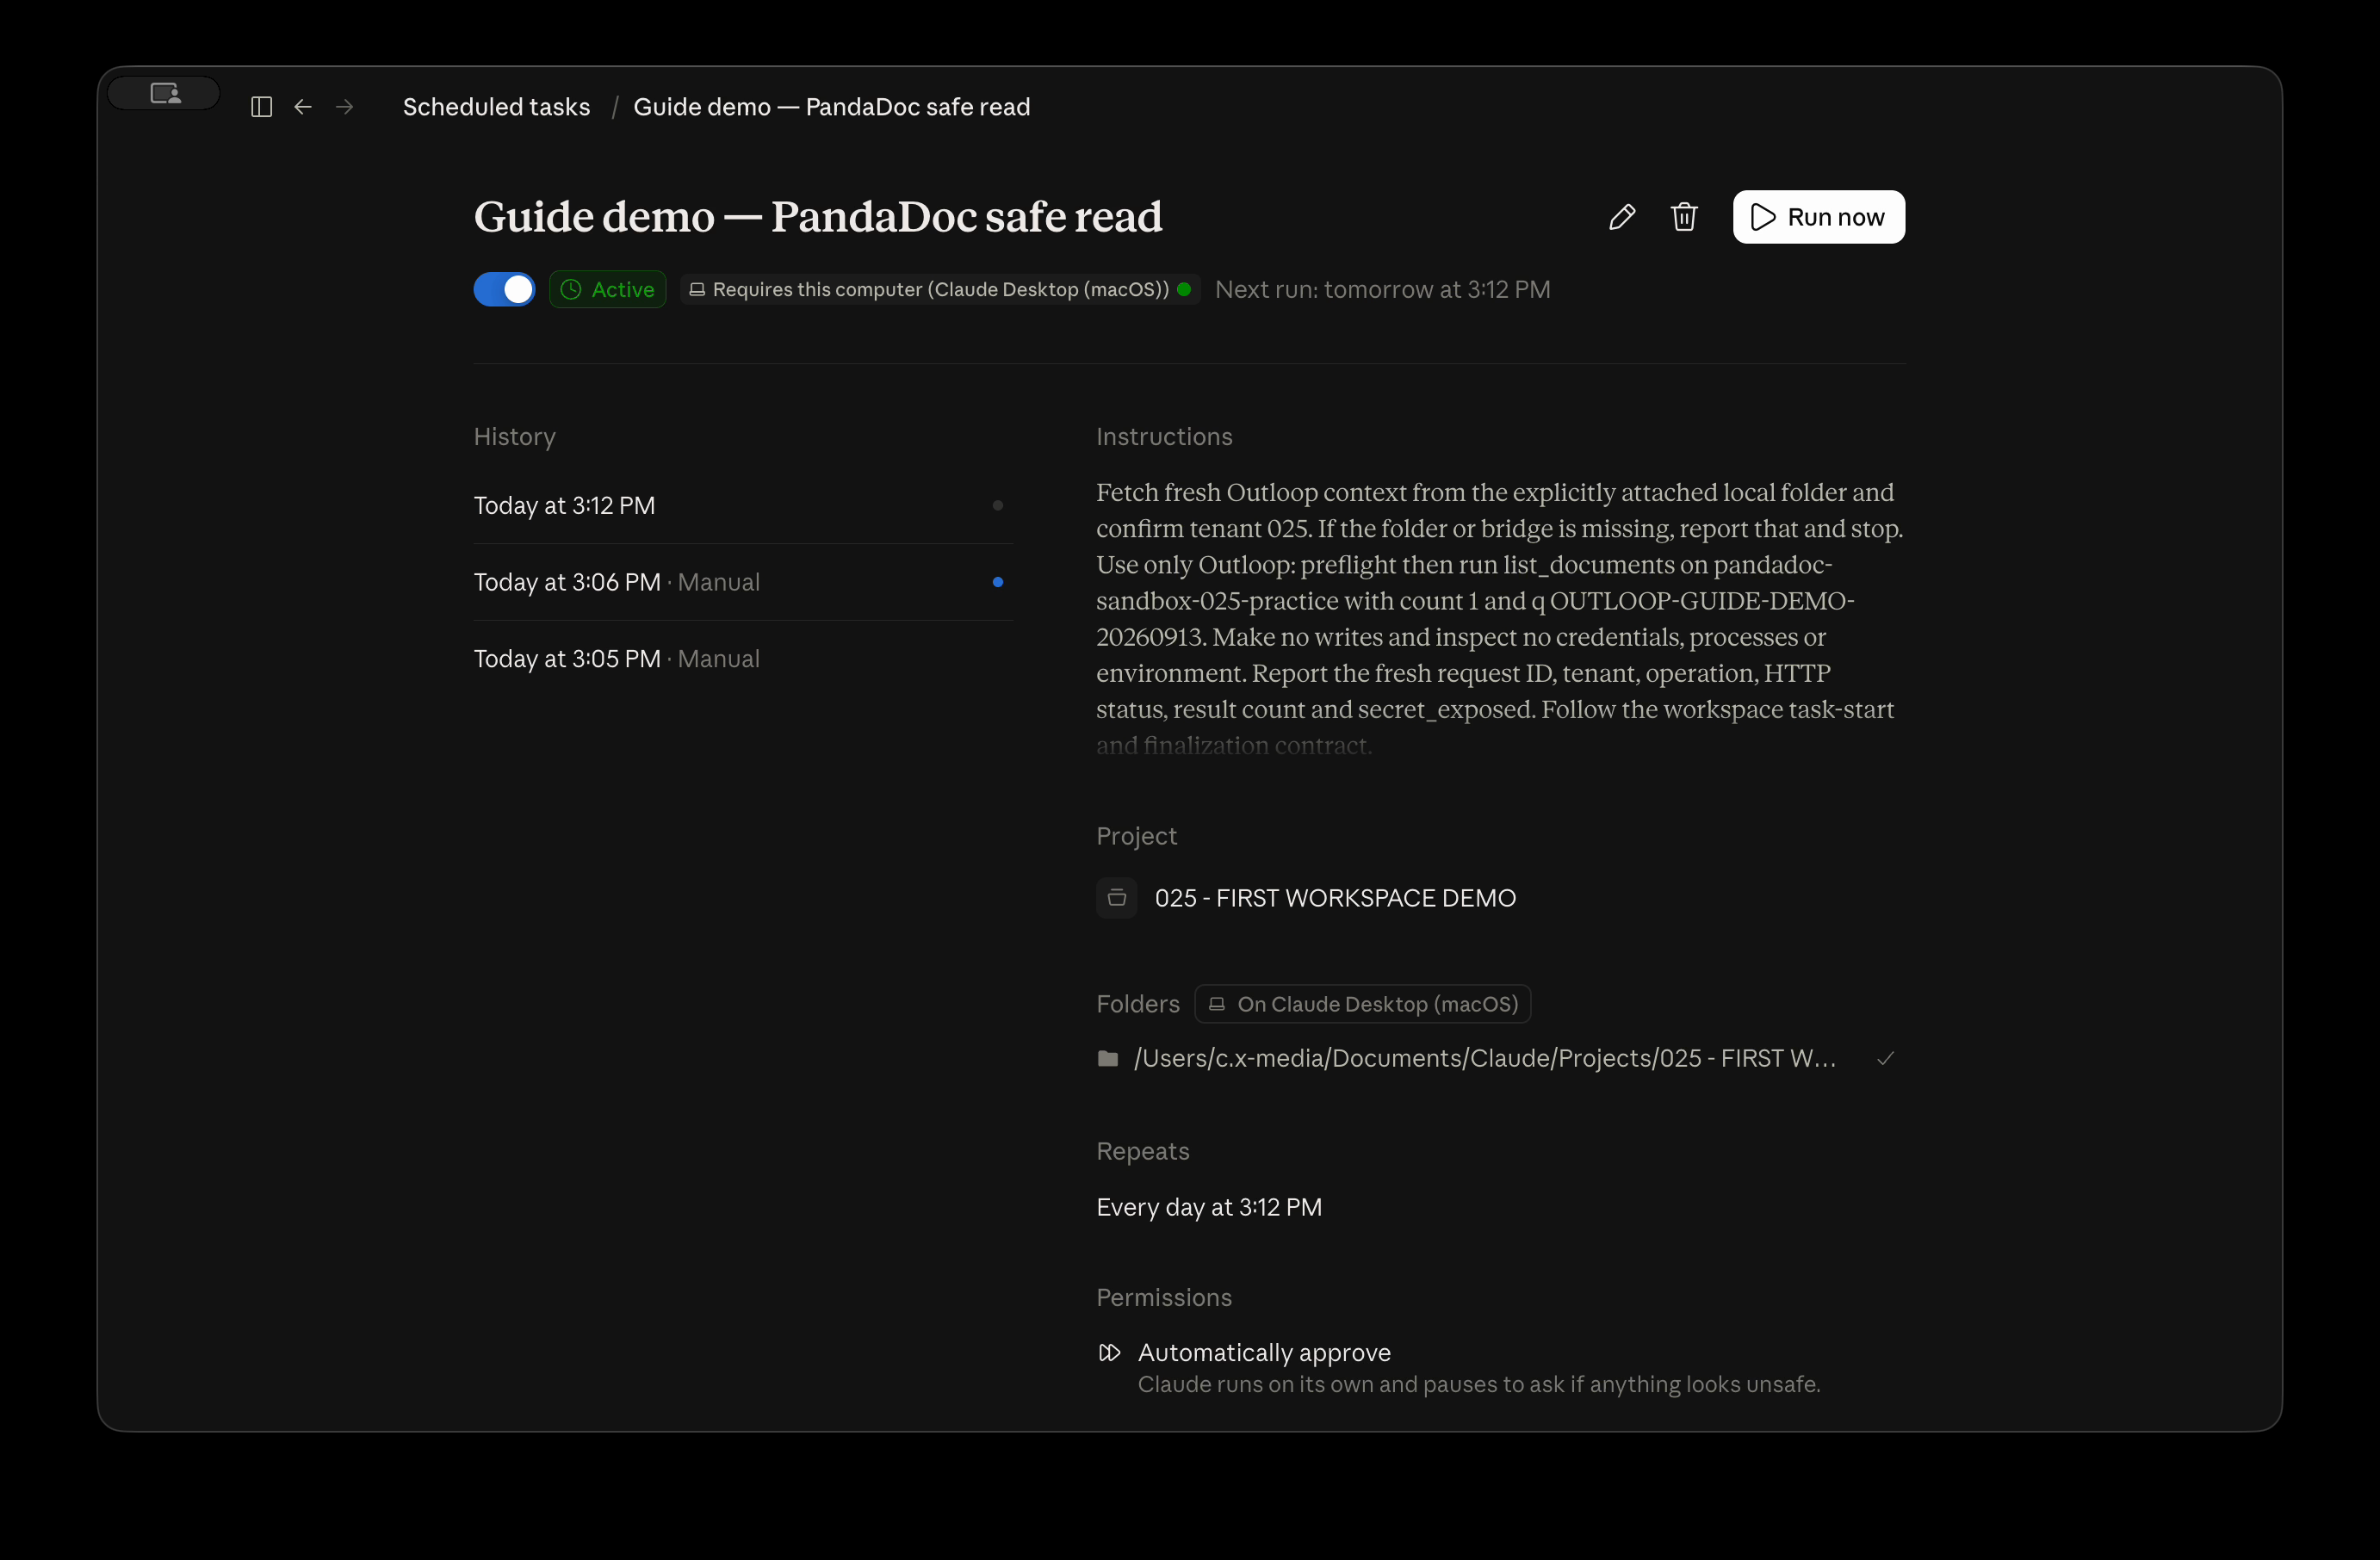
The genuine 3:12 PM timer entry appears separately from Manual runs, with the local demo folder attached. Open the image to inspect the full interface.
I create a scheduled task for a small, approved read. This local test requires this computer and uses automatic approval for its bounded operation. Creating the task inside the project did not attach its folder in this Claude version. I edit the task, choose the exact Outloop folder, and review recurring access.
The saved overview must show that local folder. Run now is a diagnostic. Its fresh receipt shows the intended workspace and a successful PandaDoc read. The saved schedule is our source of truth for the timer.
Here is the genuine 3:12 PM history entry, without a Manual label. The timer started this run. Its separate provider receipt confirms the scheduled run reached Outloop and completed the approved read. I pause the test.
Keep this computer awake for future local runs.
Here the task belongs to the project, but its session has no connected folder. It stops instead of guessing where to work. I find the exact folder in Outloop, attach it to the scheduled task, and approve the recurring folder access. Then I run a fresh diagnostic.
The successful read tells me the repair worked. This demonstrates a missing-folder failure; it is not a test against another client’s workspace.
If a schedule fails, start with its saved folder and permissions. A project name alone did not connect the folder in this test. After attaching the correct folder, I run a diagnostic and check its Outloop result. Then I inspect an actual timer-triggered run.
Both must reach the intended workspace. The 3:12 PM run has its own successful provider read; the manual test alone could not prove that. These are the same recovery and timer evidence shown earlier.
The practice demo’s genuine 15:12 timed run reached workspace 025 and completed the bounded PandaDoc read with HTTP 200 and matching Outloop evidence. Verify the same connection in your own workspace; do not assume a saved schedule or Run now proves timed execution.
Stuck at this step?
My scheduled task cannot access the folder or Outloop.
Open Edit → Folder and select the exact workspace folder. Our first diagnostic had no connected folder despite its project association and computer requirement. Confirm the folder permission, save, and verify another actual run. Keep the Mac awake and Desktop/Outloop available.
Cloud scheduling is available, but local scheduling is not.
Cloud tasks can use their available cloud context and connectors. Do not assume they inherit a local Outloop runtime because the project has the same name.
Find the point where setup stopped
Start with what you can see. Make one correction, then repeat the safe verification in that workspace.
When asking for help, include the app version, step, visible error code and a redacted request identifier. Leave credentials and private account or client information out.
Anthropic moved a button?
Find the destination first: Projects for the working folder, Customize → Skills or Plugins for packages, and Scheduled for recurring tasks. Labels can change between Desktop builds.
Compare your Claude version with this guide. If the folder or execution choices differ, verify the actual behavior before assigning access or relying on a schedule.